Buff Muff Lessons - Wistia Links
1. Welcome - Why A 28 Challenge?
Welcome
Why Kegel? Because Kegels are COOL and consistency is key!
The 28 day Buff Muff Challenge helps you put into practice what you learned in Pelvic Health 101 and gets your moving with a consistent workout each day for 28 day.
Your pelvic floor and I thank you for choosing to prioritize your pelvic health and not accept common challenges like incontinence and prolapse and unsatisfying sex as normal or 'just part of being a woman'.
I designed this program to be easy to follow and fit into your day. You will realize that 'go home and do your kegels' is kind of missing the mark a little.
Kegels are so much more than just squeezing your vagina over and over. Kegels, when coupled with your breath (I call it the core breath) and movement, really transform your pelvic floor and your entire core! You can think of this as your pelvic floor exercise program or you can think of it as your core workout. The pelvic floor is part of the core and when it works alongside the other core muscles, it is a beautiful thing.
Remember - before you get started with the challenge it is essential to go through Pelvic Health 101 first.
2. Equipment: What's Needed
Welcome
There are a few pieces of equipment that I use in the program but most are easy to substitute.
The only one that is tough to find a replacement for is a large stability ball. You will need that for the ball push-up and the seated march and the hip raise. If you don't have one then just do push ups on your knees, the seated march in a chair and the hip raise with your ankles on a sofa.
You may wish to have a yoga mat for the floor work but a carpeted floor is fine too. I use a yoga strap for one of the stretches but you can use a long scarf too.
Finally, if you have a small dumbbell (5-8 lbs) you may wish to have that for the Squats w/ Arm Circles but a soup can works (or nothing at all).
3. Group Coaching Calls
Welcome
Each week I host a live group coaching call via zoom for anyone in the monthly or yearly membership. These are optional and always available whenever you feel like joining. They are recorded and available in Resources & Call Recordings section. You can choose from Wednesdays, 8:00-9:00am PST or Thursdays, 5:00-6:00pm PST.
Note: The video states a different call time. Times have updated since the recording was made.
You can come and ask questions, learn from others, have me evaluate your posture and form, get guidance on your workouts...anything! This hour is for you.
Come to 1 or both sessions each week! As long as you are a member, you can join the call.
Join Zoom Meeting
Wednesday Call 8:00am Pacific Time
Thursday Call 5:00pm Pacific Time
Use the link below to join the calls
https://us02web.zoom.us/j/4284372824
4. Modifications for Pregnancy
Welcome
Below are some options for anyone who is pregnant. Almost all of the exercises in the Buff Muff Challenge can be done while pregnant, except a few where the bump will be in the way. There are also some exercises that are supine (laying on your back) and while many people feel fine on their back for short periods of time, others may want another option.
I will list the exercise name that is in the Challenge and then the name of what to swap it with. I will also add an image to show you the exercise. You can then work through the challenge and if there is a move that you want to modify, head back here to look for a swap.
First is the Pelvic Tilt. Swap with Ball Cat Cow
Bridge - Swap With Standing Hip Extensions.
Supine Butterfly - Swap With Ball Inner Thigh Stretch
Hip Raise With Ball and Squat With Arm Circles- Swap With Car Seat Squat or laundry hamper squat
Thoracic Release - Swap With Ball Wall Stretch and/or Chest Opener w/Ball

Push-up w/ball swap for wall push ups
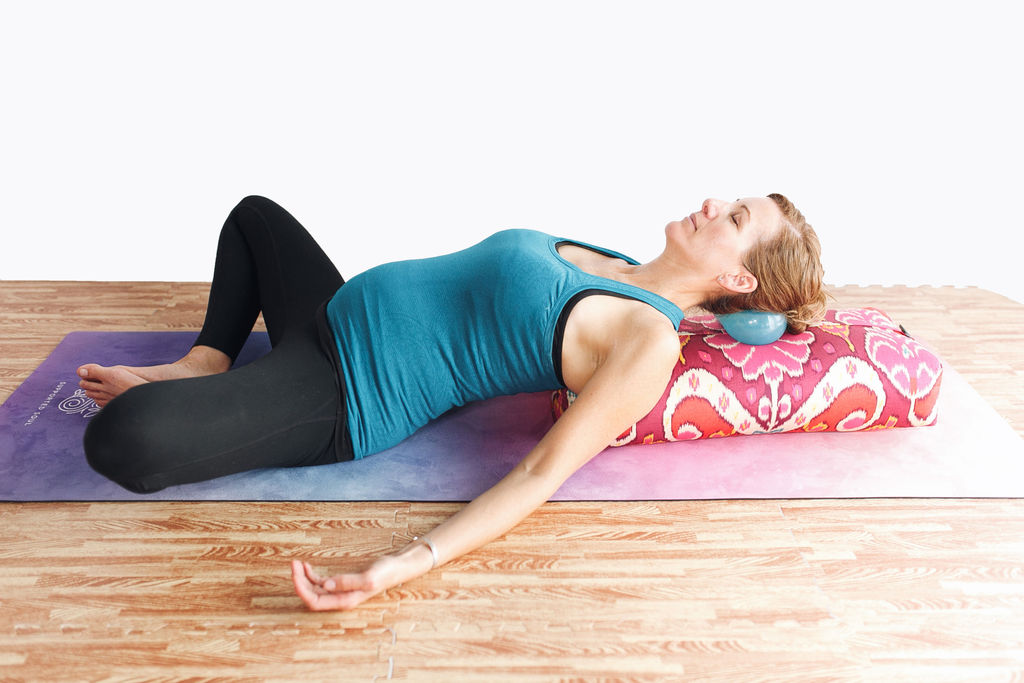
Belly Release swap for Pool Noodle Release (sit on a pool noodle as pictured below) for 30 seconds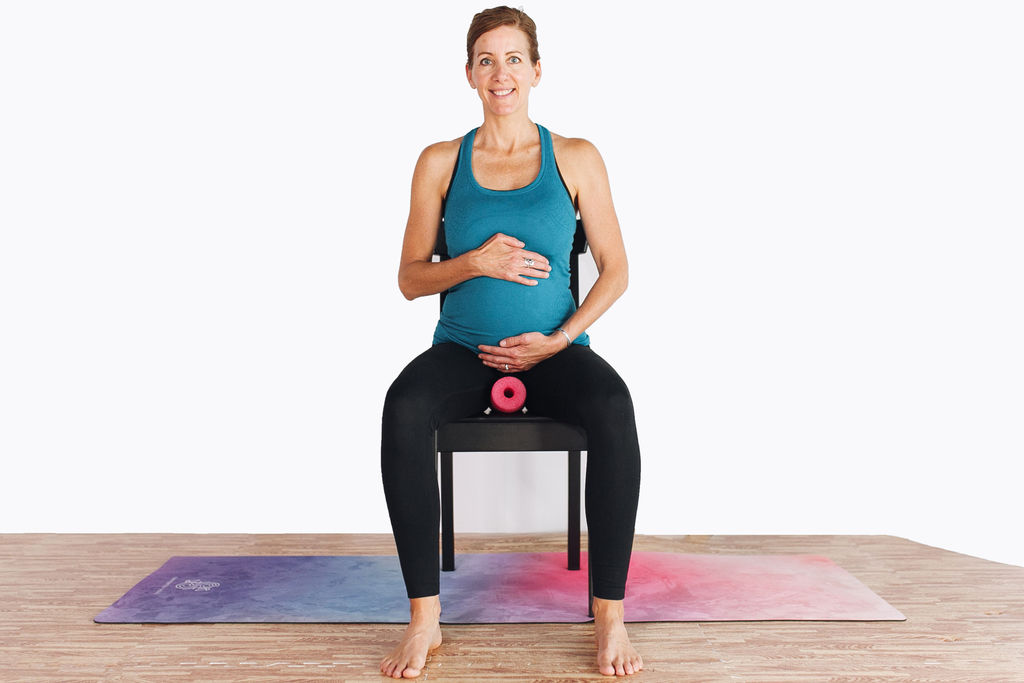
For Stacked Butterfly swap out with Deep Squat With Ball and/or Elevated Supine Butterfly and/or Seated figure 4

Supine Isometric Thigh Press Swap With Side Plank and/or Seated Ball Squeeze w/Rotation

Lower Psoas Release Swap With Quad Stretch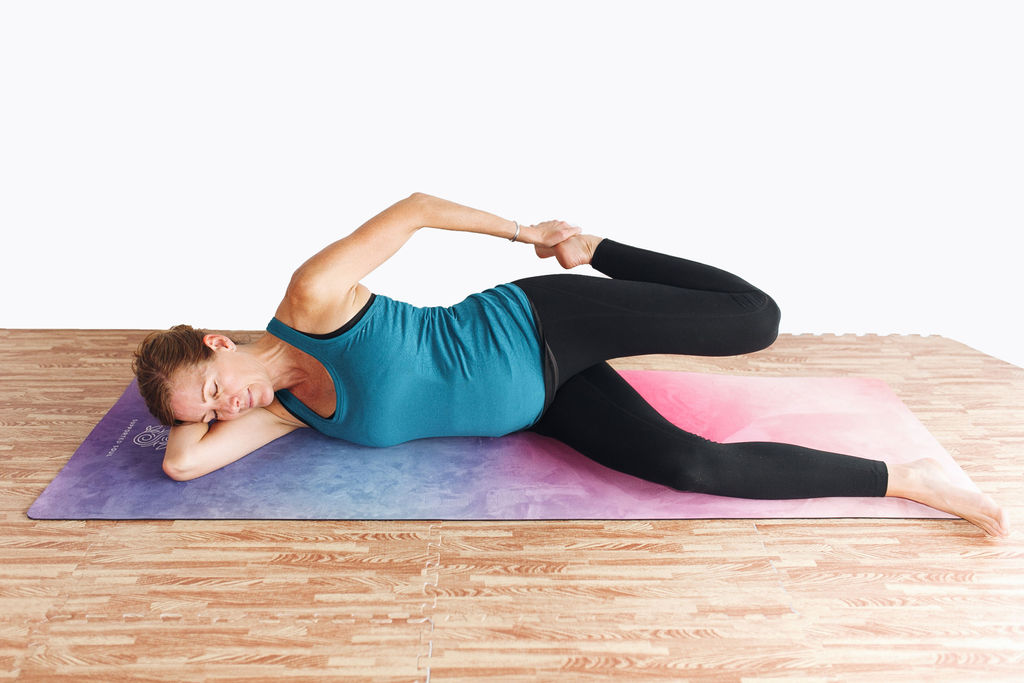
For Ball Roll Out Swap With Car Seat Carry High or Low (walk around for 10-20 seconds holding the car seat on one side)

6. Pelvic Tilt - 1 x 10
Day 1 - Core Connection
Add the core breath to this simple move to ignite your pelvic floor!
Inhale to expand, then exhale to engage (core breath) as you curl pelvis, pressing your low back into the mat. Inhale to expand as you return to neutral spine, exhale to engage as you curl your pelvis, repeat..
Complete 1 set of 10 reps.
7. Bridge - 1 x 10
Day 1 - Core Connection
Glutes and the pelvic floor are BFF's - great glutes means a great pelvic floor too!
Set yourself up on a flat surface, on your back with your knees bent and your shins close to vertical. For tighter hamstrings or knee limitations you may need to walk your feet slightly further away from your bum.
Inhale to expand, then exhale to engage (core breath) as you lift your hips evenly up toward the ceiling. Inhale to expand as you lower yourself back down and repeat.
Key things to remember with this exercise, keep your weight evenly distributed in your feet, knees will stay pointed straight and aligned with your hip bones-do not let them move inward and outward, press the back of your palms, arms and shoulders into the floor. This helps keep your chest open.
Complete 1 set of 10 reps.
8. Supine Butterfly - 60 seconds
Day 1 - Core Connection
Your inner thighs influence the pelvic floor. Take time to lengthen them so they can better help your core.
No core breath with this release.
Stay in this posture for 60 seconds. The main goal here is to be able to relax into this release. If you are feeling a deep stretch but it is causing tension in other parts of the body add a prop to modify.
Modification for this release can be done by placing pillows, yoga bolsters or blocks, rolled up towels or anything creative that you have at home under each leg. When placing a prop closer to the hip you will feel more support. As you move the support closer to the knees you will experience a greater level of stretch.
9. What is Your Best Core Cue?
Day 1 - Core Connection
No video found.
Remember back to the Core Breath video in Pelvic Health 101, where I introduced some core cues to help you activate and relax your pelvic floor? Which one did you like best?
Most people like the blueberry cue the best....imagine picking up a blueberry with your vagina and your anus. Does that resonate with you?
Some other cues are
imagine sipping a smoothie through a straw with your vagina
Draw the 4 points of your pelvis (pubic joint, tail bone, 2 sitz bones) together and upwards
Imagine your pelvic floor is like a jellyfish - inhales expand and exhales propel the jellyfish up
Imagine your tampon is slipping out and use your muscles to draw it back in and up
There is no best cue...it is whichever is best for YOU!
It is always fun to hear what cues are the most popular...and even if you made one up yourself! Some even do a combo approach - jellyfish to relax the pelvic floor and blueberry to engage the pelvic floor.
Click the community icon above and share your best core cue with the group.
10. Posterior Pelvic Floor Release - 30 seconds per side
Day 2 - Release Connect and Move
Release tension in your glutes and hear your pelvic floor sigh.
30 second's each side. No core breath with this exercise. This release can be uncomfortable in the beginning but will get easier.
You will need a hard surface so the ball does not sink into the chair.
Place the ball between your sitz bone and your anus.
Maintain relaxed breathing as you let yourself sink further into the ball with each breath. You are looking to create space and let go of any tension you may be holding.
By the way, if you've completed all of the activities so far, you are well on your way to unlocking your first reward! Keep up the good work :-)
11. Pelvic Tilt - 1 x 10
Day 2 - Release Connect and Move
Add the core breath to this simple move to ignite your pelvic floor!
Inhale to expand, then exhale to engage (core breath) as you curl pelvis, pressing your low back into the mat. Inhale to expand as you return to neutral spine, exhale to engage as you curl your pelvis, repeat..
Complete 1 set of 10 reps
12. Bridge - 1 x 10
Day 2 - Release Connect and Move
Glutes and the pelvic floor are BFF's - great glutes means a great pelvic floor too!
Set yourself up on a flat surface, on your back with your knees bent and your shins close to vertical. For tighter hamstrings or knee limitations you may need to walk your feet slightly further away from your bum.
Inhale to expand, exhale to engage (core breath) as you lift your hips evenly up toward the ceiling. Inhale to expand as you lower yourself back down and repeat.
Key things to remember with this exercise, keep your weight evenly distributed in your feet, knees will stay pointed straight and aligned with your hip bones-do not let them move inward and outward, press the back of your palms, arms and shoulders into the floor. This helps keep your chest open.
Complete 1 set of 10 reps.
13. Seated March - 1 x 10 (5 per side)
Day 2 - Release Connect and Move
Harder than it looks. Lifting the foot off the floor creates instability — can you do it without allowing the ball to roll or your pelvis to drop? It is just a small lift — about 2-3 inches... any higher and it will start to tilt your pelvis back so keep your range small.
Adding the core breath. Inhale and expand to prepare, exhale and engage as you lift the foot, inhale and expand as you set the foot back down, exhale and engage as you lift.....repeat.
Complete 1 set of 10 reps (5 per side)
A few options for modifications: you can move the ball into the corner of a room so you feel safely wedged between 2 walls. Another option is only lifting the heel of 1 foot if you feel like you still need 2 points of contact on the ground. You can also perform this in a chair as you work your way up to a greater balance challenge on the ball.
14. Supine Butterfly - 60 seconds
Day 2 - Release Connect and Move
Your inner thighs influence the pelvic floor. Take time to lengthen them so they can better help your core.
No core breath with this release.
Stay in this posture for 60 seconds. The main goal here is to be able to relax into this release. If you are feeling a deep stretch but it is causing tension in other parts of the body add a prop to modify.
Modification for this release can be done by placing pillows, yoga bolsters or blocks, rolled up towels or anything creative that you have at home under each leg. When placing a prop closer to the hip you will feel more support. As you move the support closer to the knees you will experience a greater level of stretch.
15. Supine Butterfly - 60 seconds
Day 3 - Glutes And Pelvic Floor
Your inner thighs influence the pelvic floor. Take time to lengthen them so they can better help your core.
No core breath with this release.
Stay in this posture for 60 seconds. The main goal here is to be able to relax into this release. If you are feeling a deep stretch but it is causing tension in other parts of the body add a prop to modify.
Modification for this release can be done by placing pillows, yoga bolsters or blocks, rolled up towels or anything creative that you have at home under each leg. When placing a prop closer to the hip you will feel more support. As you move the support closer to the knees you will experience a greater level of stretch.
16. Pelvic Tilt - 1 x 10
Day 3 - Glutes And Pelvic Floor
Add the core breath to this simple move to ignite your pelvic floor!
Inhale to expand, then exhale to engage (core breath) as you curl pelvis, pressing your low back into the mat. Inhale to expand as you return to neutral spine, exhale to engage as you curl your pelvis, repeat..
Complete 1 set of 10 reps.
17. Bridge - 1 x 10
Day 3 - Glutes And Pelvic Floor
Glutes and the pelvic floor are BFF's - great glutes means a great pelvic floor too!
Set yourself up on a flat surface, on your back with your knees bent and your shins close to vertical. For tighter hamstrings or knee limitations you may need to walk your feet slightly further away from your bum.
Inhale to expand, exhale to engage (core breath) as you lift your hips evenly up toward the ceiling. Inhale to expand as you lower yourself back down and repeat.
Key things to remember with this exercise, keep your weight evenly distributed in your feet, knees will stay pointed straight and aligned with your hip bones-do not let them move inward and outward, press the back of your palms, arms and shoulders into the floor. This helps keep your chest open.
Complete 1 set of 10 reps.
18. Hip Raise W/Ball - 1 x 10
Day 3 - Glutes And Pelvic Floor
Core control starts with the pelvic floor. This move fires up the backs of the legs and challenges your balance.
Set yourself up with the ball placed under your feet and calves. Adding in your core breath, you will inhale to expand, then exhale to engage your pelvic floor then raise your hips up towards the ceiling. Inhale to expand as you lower yourself back down to your start position. This counts as 1 repetition.
I've added in a few progressions below if you feel like you want to more of a challenge. Pick the one that works best for your body and the level you are at today.
------------------------------------------------------------------------------------------------------------------------------
Progression #1: You will bend your knees while the hips are elevated, curling the ball towards your bum. Then lower your hips back to the floor and extend the legs to return to your start position. This is 1 repetition. Repeat x10.
Your breathing pattern will be as follows: Inhale to prepare, exhale to engage lifting the hips. Inhale-expand as you pause. Exhale to engage, curling the ball towards your bum. Inhale to expand and lower yourself back to the floor. Reset for your next repetition.
------------------------------------------------------------------------------------------------------------------------------
Progression #2 : Hips will remain elevated as you curl the ball towards your bum, followed by extending and straightening the legs. This is 1 repetition. Repeat x10
Breathing pattern will be as follows: Inhale to prepare. Exhale and engage as you lift your hips up. Inhale and expand with your pause. Exhale-engage curling the ball towards your bum. Inhale and expand maintaining elevated hips. Exhale and engage extending the legs back out away from the hips.
------------------------------------------------------------------------------------------------------------------------------
Progression #3: Now we will bring it all together. This option will follow the same movement instructions as #2, but we will be moving through the exercise quicker. This encourages an added core breath challenge.
Inhale and expand to prepare. Exhale to engage as you lift the hips up and curl the ball towards your bum. Inhale and expand as you expand the legs back out away from your body. This complete move is 1 repetition. Remember to keep those hips up!
19. Thoracic Release - 60 seconds
Day 3 - Glutes And Pelvic Floor
Find length and space in your upper back, shoulders and side body so you can breathe better and therefore kegel better!
No core breath added here. Stay in this posture for 60 seconds.
Start by kneeling with the ball in front of you on your mat. Toes can be tucked or top sides of the feet can remain flat on the floor if this is more comfortable. Push the ball away to allow a lengthening in your arms and side body. Arms should remain straight. If you feel a shoulder impingement or discomfort spread the arms a bit wider on the ball.
Let your hips sink back on to your heels and check in with your ribs to confirm they have not become thrust forward, causing an overarching of the low back. Take a few moments here and allow your body to bring in more length with each breath.
You can make this release more dynamic by slowly rotating the torso on the ball from side to side, attempting to gain more length in your side body. Another option is to lift your bum off of your heels and move your arms forward and back on the ball rather than side to side.
Modification options: Seated on the ball with arms extended up the wall, as shown in the slide.
20. Thoracic Release - 60 seconds
Day 4 - One More Time
Find length and space in your upper back, shoulders and side body so you can breathe better and therefore kegel better!
No core breath added here. Stay in this posture for 60 seconds.
Start by kneeling with the ball in front of you on your mat. Toes can be tucked or top sides of the feet can remain flat on the floor if this is more comfortable. Push the ball away to allow a lengthening in your arms and side body. Arms should remain straight. If you feel a shoulder impingement or discomfort spread the arms a bit wider on the ball.
Let your hips sink back on to your heels and check in with your ribs to confirm they have not become thrust forward, causing an overarching of the low back. Take a few moments here and allow your body to bring in more length with each breath.
You can make this release more dynamic by slowly rotating the torso on the ball from side to side, attempting to gain more length in your side body. Another option is to lift your bum off of your heels and move your arms forward and back on the ball rather than side to side.
Here is a modification for those who don't like to be on their knees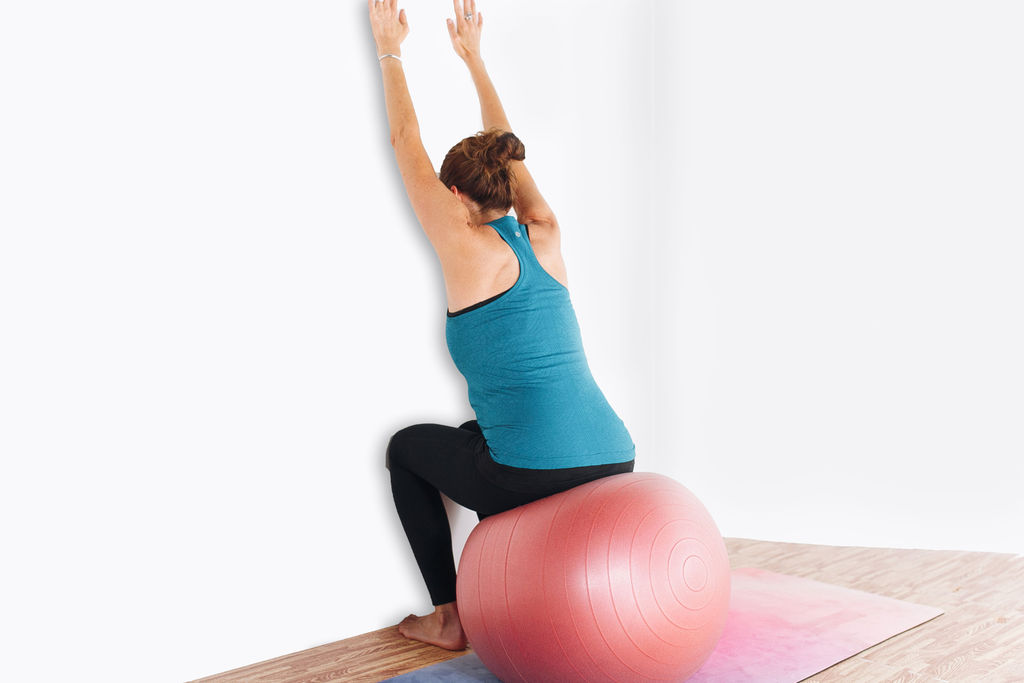
21. Pelvic Tilt - 2 x 10
Day 4 - One More Time
Add the core breath to this simple move to ignite your pelvic floor!
Inhale to expand, then exhale to engage (core breath) as you curl pelvis, pressing your low back into the mat. Inhale to expand as you return to neutral spine, exhale to engage as you curl your pelvis, repeat..
Complete 2 sets of 10 reps.
22. Bridge - 2 x 10
Day 4 - One More Time
Glutes and the pelvic floor are BFF's - great glutes means a great pelvic floor too!
Set yourself up on a flat surface, on your back with your knees bent and your shins close to vertical. For tighter hamstrings or knee limitations you may need to walk your feet slightly further away from your bum.
Inhale to expand, exhale to engage (core breath) as you lift your hips evenly up toward the ceiling. Inhale to expand as you lower yourself back down and repeat.
Key things to remember with this exercise, keep your weight evenly distributed in your feet, knees will stay pointed straight and aligned with your hip bones-do not let them move inward and outward, press the back of your palms, arms and shoulders into the floor. This helps keep your chest open.
Complete 2 set of 10 reps.
23. Hip Raise W/ ball - 2 x 10
Day 4 - One More Time
Complete 2 sets of 10 reps.
Core control starts with the pelvic floor. This move fires up the backs of the legs and challenges your balance.
Set yourself up with the ball placed under your feet and calves. Adding in your core breath, you will inhale to expand, exhale to engage lifting your pelvic floor as you raise your hips up towards the ceiling. Inhale to expand as you lower yourself back down to your start position. This counts as 1 repetition.
I've added in a few progressions below if you feel like you want to more of a challenge. Pick the one that works best for your body and the level you are at today.
------------------------------------------------------------------------------------------------------------------------------
Progression #1: You will bend your knees while the hips are elevated, curling the ball towards your bum. Then lower your hips back to the floor and extend the legs to return to your start position. This is 1 repetition. Repeat x10.
Your breathing pattern will be as follows: Inhale to prepare, exhale to engage lifting the hips. Inhale-expand as you pause. Exhale to engage, curling the ball towards your bum. Inhale to expand and lower yourself back to the floor. Reset for your next repetition.
------------------------------------------------------------------------------------------------------------------------------
Progression #2 : Hips will remain elevated as you curl the ball towards your bum, followed by extending and straightening the legs. This is 1 repetition. Repeat x10
Breathing pattern will be as follows: Inhale to prepare. Exhale and engage as you lift your hips up. Inhale and expand with your pause. Exhale-engage curling the ball towards your bum. Inhale and expand maintaining elevated hips. Exhale and engage extending the legs back out away from the hips.
------------------------------------------------------------------------------------------------------------------------------
Progression #3: Now we will bring it all together. This option will follow the same movement instructions as #2, but we will be moving through the exercise quicker. This encourages an added core breath challenge.
Inhale and expand to prepare. Exhale to engage as you lift the hips up and curl the ball towards your bum. Inhale and expand as you expand the legs back out away from your body. This complete move is 1 repetition. Remember to keep those hips up!
24. Stacked Butterfly - 30 seconds/side
Day 4 - One More Time
Oh those hips! How they love this pose! (Inner thighs too)
No core breath. 30 seconds each side. Prop needed: Yoga block, small pillow or a rolled up towel. (just one of these options is necessary)
Lying on your back with your head and neck in neutral, allow your right knee to fall out to the side maintaining a flexed ankle.
Now place your left ankle, also flexed, in the nook that separates the top of your right calf and your right knee. From here allow the top knee to gently open towards the floor. Here is where you will place your prop under the left hip for some extra support. Reminder that this should feel relaxing and you are seeking a gentle stretch.
If stacking the foot in the nook feels like too much of a stretch to begin you can work your way into this pose. Your setup will be the same, but you can place the top foot on top of the bottom ankle and then work your way up the leg from there. As your hips begin to open and you settle into the pose you can adjust your foot placement by moving it closer to the knee.
Key point to remember: maintain ankle flexion on both sides. Ankle flexion= top of foot pulled towards the knees.
25. Posterior Pelvic Floor Release - 30 seconds/side
Day 5 - Not Your Mama's Kegels
Release tension in your glutes and hear your pelvic floor sigh.
30 seconds each side. No core breath with this release.
You will need a hard surface so the ball does not sink into the chair.
Place the ball between your sitz bone and your anus.
Maintain relaxed breathing as you let yourself sink further into the ball with each breath. You are looking to create space and let go of any tension you may be holding.
26. Bridge - 2 x 10
Day 5 - Not Your Mama's Kegels
Glutes and the pelvic floor are BFF's - great glutes means a great pelvic floor too!
Set yourself up on a flat surface, on your back with your knees bent and your shins close to vertical. For tighter hamstrings or knee limitations you may need to walk your feet slightly further away from your bum.
Inhale to expand, exhale to engage (core breath) as you lift your hips evenly up toward the ceiling. Inhale to expand as you lower yourself back down and repeat.
Key things to remember with this exercise, keep your weight evenly distributed in your feet, knees will stay pointed straight and aligned with your hip bones-do not let them move inward and outward, press the back of your palms, arms and shoulders into the floor. This helps keep your chest open.
Complete 2 set of 10 reps.
27. Hip Raise W/Ball - 2 x 10
Day 5 - Not Your Mama's Kegels
Complete 2 sets of 10 reps.
Core control starts with the pelvic floor. This move fires up the backs of the legs and challenges your balance.
Set yourself up with the ball placed under your feet and calves. Adding in your core breath, you will inhale to expand, exhale to engage lifting your pelvic floor as you raise your hips up towards the ceiling. Inhale to expand as you lower yourself back down to your start position. This counts as 1 repetition.
I've added in a few progressions below if you feel like you want to more of a challenge. Pick the one that works best for your body and the level you are at today.
------------------------------------------------------------------------------------------------------------------------------
Progression #1: You will bend your knees while the hips are elevated, curling the ball towards your bum. Then lower your hips back to the floor and extend the legs to return to your start position. This is 1 repetition. Repeat 2x10.
Your breathing pattern will be as follows: Inhale to prepare, exhale to engage lifting the hips. Inhale-expand as you pause. Exhale to engage, curling the ball towards your bum. Inhale to expand and lower yourself back to the floor. Reset for your next repetition.
------------------------------------------------------------------------------------------------------------------------------
Progression #2 : Hips will remain elevated as you curl the ball towards your bum, followed by extending and straightening the legs. This is 1 repetition. Repeat 2x10
Breathing pattern will be as follows: Inhale to prepare. Exhale and engage as you lift your hips up. Inhale and expand with your pause. Exhale-engage curling the ball towards your bum. Inhale and expand maintaining elevated hips. Exhale and engage extending the legs back out away from the hips.
------------------------------------------------------------------------------------------------------------------------------
Progression #3: Now we will bring it all together. This option will follow the same movement instructions as #2, but we will be moving through the exercise quicker. This encourages an added core breath challenge. 2x10
Inhale and expand to prepare. Exhale to engage as you lift the hips up and curl the ball towards your bum. Inhale and expand as you expand the legs back out away from your body. This complete move is 1 repetition. Remember to keep those hips up!
28. Seated March - 1 x 12
Day 5 - Not Your Mama's Kegels
Harder than it looks. Lifting the foot off the floor creates instability — can you do it without allowing the ball to roll or your pelvis to drop? It is just a small lift — about 2-3 inches... any higher and it will start to tilt your pelvis back so keep your range small.
Adding the core breath. Inhale and expand to prepare, exhale and engage as you lift the foot, inhale and expand as you set the foot back down, exhale and engage as you lift.....repeat.
Complete 1 set of 12 reps (6 per side)
A few options for modifications: you can move the ball into the corner of a room so you feel safely wedged between 2 walls. Another option is only lifting the heel of 1 foot if you feel like you still need 2 points of contact on the ground. You can also perform this in a chair as you work your way up to a greater balance challenge on the ball.
29. Thoracic Release - 60 seconds
Day 5 - Not Your Mama's Kegels
We made it to the weekend, woo! Check in with the group after this exercise and let us know how you're doing!
Find length and space in your upper back, shoulders and side body so you can breathe better and therefore kegel better!
No core breath added here. Stay in this posture for 60 seconds.
Start by kneeling with the ball in front of you on your mat. Toes can be tucked or top sides of the feet can remain flat on the floor if this is more comfortable. Push the ball away to allow a lengthening in your arms and side body. Arms should remain straight. If you feel a shoulder impingement or discomfort spread the arms a bit wider on the ball.
Let your hips sink back on to your heels and check in with your ribs to confirm they have not become thrust forward, causing an overarching of the low back. Take a few moments here and allow your body to bring in more length with each breath.
You can make this release more dynamic by slowly rotating the torso on the ball from side to side, attempting to gain more length in your side body. Another option is to lift your bum off of your heels and move your arms forward and back on the ball rather than side to side.
30. BONUS: Incontinence Lifestyle Tips
Day 5 - Not Your Mama's Kegels
Some lifestyle tips to manage incontinence
31. Standing Hamstring Release - 60 seconds
Day 6 - Up The Ante On Your Squat
It's all about creating length in the hamstrings while the pelvis is in neutral — this will translate into being able to find and stay in neutral more often which will make your pelvic floor very happy!
Props needed: Chair and anything that you can use to bring the seat of the chair up closer to you. Options: blocks, pillows, yoga bolster, rolled up towels or folded blankets.
No core breath here. Stay in this position for 30-60 seconds.
You will set up by standing with your feet pelvis width apart, toes pointed straight ahead, neutral spine which includes a gentle curve in your low back. Ribs are down so that they stay in line with the top of the pelvis. From here you will gradually fold yourself forward, hinging at the hip joint (crease at the top of your legs) and place your arms at the top of the stack on the chair. Your legs will remain straight but knees are not locked.
Feel for the curve in your low back, imagine you are pulling your sacrum up towards the ceiling as you press your heels down into the floor.
Return your awareness into your ribs. Verify that you have not thrust them forward and insure they are down and inline with your pelvis. If you find you are able to maintain a neutral pelvis you can remove one of the props and see if this allows a greater stretch.
Key things to remember: The goal is to find length in the backside of your legs and relax your pelvic floor. The most common misunderstanding of the posture in this exercise is the alignment of the spine. Be sure not curl or round yourself forward in an effort to reach the chair.
If you are hyper mobile at the joints this stretch can be challenging to connect with. In this instance I encourage you to focus on lifting the scrum and pressing into your feet at the same time to emphasize more of a mind body connection with the backs of your legs.
32. Hip Raise W/Ball - 2 x 12
Day 6 - Up The Ante On Your Squat
Complete 2 sets of 12 reps
Core control starts with the pelvic floor. This move fires up the backs of the legs and challenges your balance.
Set yourself up with the ball placed under your feet and calves. Adding in your core breath, you will inhale to expand, exhale to engage lifting your pelvic floor as you raise your hips up towards the ceiling. Inhale to expand as you lower yourself back down to your start position. This counts as 1 repetition.
I've added in a few progressions below if you feel like you want to more of a challenge. Pick the one that works best for your body and the level you are at today.
------------------------------------------------------------------------------------------------------------------------------
Progression #1: You will bend your knees while the hips are elevated, curling the ball towards your bum. Then lower your hips back to the floor and extend the legs to return to your start position. This is 1 repetition. Repeat 2x12.
Your breathing pattern will be as follows: Inhale to prepare, exhale to engage lifting the hips. Inhale-expand as you pause. Exhale to engage, curling the ball towards your bum. Inhale to expand and lower yourself back to the floor. Reset for your next repetition.
------------------------------------------------------------------------------------------------------------------------------
Progression #2 : Hips will remain elevated as you curl the ball towards your bum, followed by extending and straightening the legs. This is 1 repetition. Repeat 2x12
Breathing pattern will be as follows: Inhale to prepare. Exhale and engage as you lift your hips up. Inhale and expand with your pause. Exhale-engage curling the ball towards your bum. Inhale and expand maintaining elevated hips. Exhale and engage extending the legs back out away from the hips.
------------------------------------------------------------------------------------------------------------------------------
Progression #3: Now we will bring it all together. This option will follow the same movement instructions as #2, but we will be moving through the exercise quicker. This encourages an added core breath challenge. 2x12
Inhale and expand to prepare. Exhale to engage as you lift the hips up and curl the ball towards your bum. Inhale and expand as you expand the legs back out away from your body. This complete move is 1 repetition. Remember to keep those hips up!
33. Seated March - 2 x 10
Day 6 - Up The Ante On Your Squat
Harder than it looks. Lifting the foot off the floor creates instability — can you do it without allowing the ball to roll or your pelvis to drop? It is just a small lift — about 2-3 inches... any higher and it will start to tilt your pelvis back so keep your range small.
Adding the core breath. Inhale and expand to prepare, exhale and engage as you lift the foot, inhale and expand as you set the foot back down, exhale and engage as you lift.....repeat.
Complete 2 sets of 10 reps (10 per side)
A few options for modifications: you can move the ball into the corner of a room so you feel safely wedged between 2 walls. Another option is only lifting the heel of 1 foot if you feel like you still need 2 points of contact on the ground. You can also perform this in a chair as you work your way up to a greater balance challenge on the ball.
34. Squats - 1 x 10
Day 6 - Up The Ante On Your Squat
If there is one exercise we all need to do more, it is the squat. A natural movement that we do perfectly as a child and then become less than perfect as we get older and sit more.
Core breath is added here. Inhale and expand on the way down, exhale to engage as you stand up. The exhale will begin right before you stand. It is common that people have a hard time connecting with the proper breathing pattern on this exercise, as well as feeling the contraction as they stand back up. This will change over time with practice and consistency. If you find yourself breathing the opposite way pause to reset your breath and resync.
Complete 1 set of 10 reps
There are a few variations that can be practiced depending on how much of a challenge you'd like. Even for the well seasoned exerciser using a chair can encourage a greater squat depth when this is practiced with slow controlled movements and the core breath connection.
Option #1: Sit to stand. You will stand a few inches in front of the chair with your feet pelvis width apart, toes pointed straight ahead and a gentle curve in your low back. Hands can be placed on your hips or extended out in from of you. Maintaining a neutral spine, press your hips back to lower yourself down on to the seat. Inhale as you lower yourself down. Be aware once you're seated not curl or tuck your pelvis under. Tucking can be prevented by keeping your shoulders stacked over the hips or slightly in front of them. From the seated position you will press your whole foot evenly into the floor to propel yourself back to standing. Exhaling on the way up.
Option #2: Squat with a bum tap onto the chair. This will follow the same instructions as above, but rather than sitting all the way down you will tap your hips onto the chair and then immediately return to a standing position. Inhale on the way down, exhale and engage on the way up.
Option #3: Squat with or without the assistance of the chair. If you choose to use the chair for balance step behind it so you can keep one hand on the chair back. Go through your same setup check points, width of the feet, toe position, weight distribution on the feet and neutral pelvis. Breathing in and keeping your gaze forward as you lower yourself down on to an invisible chair. Exhale and engage as you return to standing.
Key points to remember: The knee joint can be a cranky limiter. Often when we are experiencing discomfort it is because the muscles and ligaments surrounding the joint need to be strengthened. In the beginning of practicing a squat keeping your knees aligned over your ankles can help to minimize strain. Over time it is ok to let your knees start to move forward when they bend. This helps to strengthen your thigh muscles. Also being mindful that your knees and toes are pointed and moving the same direction, as well as keeping more weight in the back 2/3 of your feet will help reduce extra pressure you might feel in the joints.
35. Supine Butterfly - 60 seconds
Day 6 - Up The Ante On Your Squat
Your inner thighs influence the pelvic floor. Take time to lengthen them so they can better help your core.
No core breath with this release.
Stay in this posture for 60 seconds. The main goal here is to be able to relax into this release. If you are feeling a deep stretch but it is causing tension in other parts of the body add a prop to modify.
Modification for this release can be done by placing pillows, yoga bolsters or blocks, rolled up towels or anything creative that you have at home under each leg. When placing a prop closer to the hip you will feel more support. As you move the support closer to the knees you will experience a greater level of stretch.
36. Stacked Butterfly - 30 seconds/side
Day 7 - Sometimes More Is Better
Oh those hips! How they love this pose! (Inner thighs too!)
No core breath. 30 seconds each side. Prop needed: Yoga block, small pillow or a rolled up towel. (just one of these options is necessary)
Lying on your back with your head and neck in neutral, allow your right knee to fall out to the side maintaining a flexed ankle.
Now place your left ankle, also flexed, in the nook that separates the top of your right calf and your right knee. From here allow the top knee to gently open towards the floor. Here is where you will place your prop under the left hip for some extra support. Reminder that this should feel relaxing and you are seeking a gentle stretch.
If stacking the foot in the nook feels like too much of a stretch to begin you can work your way into this pose. Your setup will be the same, but you can place the top foot on top of the bottom ankle and then work your way up the leg from there. As your hips begin to open and you settle into the pose you can adjust your foot placement by moving it closer to the knee.
Key point to remember: maintain ankle flexion on both sides. Ankle flexion= top of foot pulled towards the knees.
37. Seated March - 2 x 12
Day 7 - Sometimes More Is Better
Harder than it looks. Lifting the foot off the floor creates instability — can you do it without allowing the ball to roll or your pelvis to drop? It is just a small lift — about 2-3 inches... any higher and it will start to tilt your pelvis back so keep your range small.
Adding the core breath. Inhale and expand to prepare, exhale and engage as you lift the foot, inhale and expand as you set the foot back down, exhale and engage as you lift.....repeat.
Complete 2 sets of 12 reps (12 per side)
A few options for modifications: you can move the ball into the corner of a room so you feel safely wedged between 2 walls. Another option is only lifting the heel of 1 foot if you feel like you still need 2 points of contact on the ground. You can also perform this in a chair as you work your way up to a greater balance challenge on the ball.
38. Squats - 2 x 10
Day 7 - Sometimes More Is Better
If there is one exercise we all need to do more, it is the squat. A natural movement that we do perfectly as a child and then become less than perfect as we get older and sit more.
Core breath is added here. Inhale and expand on the way down, exhale to engage as you stand up. The exhale will begin right before you stand. It is common that people have a hard time connecting with the proper breathing pattern on this exercise, as well as feeling the contraction as they stand back up. This will change over time with practice and consistency. If you find yourself breathing the opposite way pause to reset your breath and resync.
Complete 2 set of 10 reps
There are a few variations that can be practiced depending on how much of a challenge you'd like. Even for the well seasoned exerciser using a chair can encourage a greater squat depth when this is practiced with slow controlled movements and the core breath connection.
Option #1: Sit to stand. You will stand a few inches in front of the chair with your feet pelvis width apart, toes pointed straight ahead and a gentle curve in your low back. Hands can be placed on your hips or extended out in from of you. Maintaining a neutral spine, press your hips back to lower yourself down on to the seat. Inhale as you lower yourself down. Be aware once you're seated not curl or tuck your pelvis under. Tucking can be prevented by keeping your shoulders stacked over the hips or slightly in front of them. From the seated position you will press your whole foot evenly into the floor to propel yourself back to standing. Exhaling on the way up.
Option #2: Squat with a bum tap onto the chair. This will follow the same instructions as above, but rather than sitting all the way down you will tap your hips onto the chair and then immediately return to a standing position. Inhale on the way down, exhale and engage on the way up.
Option #3: Squat with or without the assistance of the chair. If you choose to use the chair for balance step behind it so you can keep one hand on the chair back. Go through your same setup check points, width of the feet, toe position, weight distribution on the feet and neutral pelvis. Breathing in and keeping your gaze forward as you lower yourself down on to an invisible chair. Exhale and engage as you return to standing.
Key points to remember: The knee joint can be a cranky limiter. Often when we are experiencing discomfort it is because the muscles and ligaments surrounding the joint need to be strengthened. In the beginning of practicing a squat keeping your knees aligned over your ankles can help to minimize strain. Over time it is ok to let your knees start to move forward when they bend. This helps to strengthen your thigh muscles. Also being mindful that your knees and toes are pointed and moving the same direction, as well as keeping more weight in the back 2/3 of your feet will help reduce extra pressure you might feel in the joints.
39. Bridge - 2 x 12
Day 7 - Sometimes More Is Better
Glutes and the pelvic floor are BFF's - great glutes means a great pelvic floor too!
Set yourself up on a flat surface, on your back with your knees bent and your shins close to vertical. For tighter hamstrings or knee limitations you may need to walk your feet slightly further away from your bum.
Inhale to expand, exhale to engage (core breath) as you lift your hips evenly up toward the ceiling. Inhale to expand as you lower yourself back down and repeat.
Key things to remember with this exercise, keep your weight evenly distributed in your feet, knees will stay pointed straight and aligned with your hip bones-do not let them move inward and outward, press the back of your palms, arms and shoulders into the floor. This helps keep your chest open.
Complete 2 sets of 12 reps.
40. Thoracic Release - 60 seconds
Day 7 - Sometimes More Is Better
Find length and space in your upper back, shoulders and side body so you can breathe better and therefore kegel better!
No core breath added here. Stay in this posture for 60 seconds.
Start by kneeling with the ball in front of you on your mat. Toes can be tucked or top sides of the feet can remain flat on the floor if this is more comfortable. Push the ball away to allow a lengthening in your arms and side body. Arms should remain straight. If you feel a shoulder impingement or discomfort spread the arms a bit wider on the ball.
Let your hips sink back on to your heels and check in with your ribs to confirm they have not become thrust forward, causing an overarching of the low back. Take a few moments here and allow your body to bring in more length with each breath.
You can make this release more dynamic by slowly rotating the torso on the ball from side to side, attempting to gain more length in your side body. Another option is to lift your bum off of your heels and move your arms forward and back on the ball rather than side to side.
41. Standing Hamstring Release - 60 seconds
Day 8 - Meet Frank Einstein
It's all about creating length in the hamstrings while the pelvis is in neutral — this will translate into being able to find and stay in neutral more often which will make your pelvic floor very happy!
Props needed: Chair and anything that you can use to bring the seat of the chair up closer to you. Options: blocks, pillows, yoga bolster, rolled up towels or folded blankets.
No core breath here. Stay in this position for 30-60 seconds.
You will set up by standing with your feet pelvis width apart, toes pointed straight ahead, neutral spine which includes a gentle curve in your low back. Ribs are down so that they stay in line with the top of the pelvis. From here you will gradually fold yourself forward, hinging at the hip joint (crease at the top of your legs) and place your arms at the top of the stack on the chair. Your legs will remain straight but knees are not locked.
Feel for the curve in your low back, imagine you are pulling your sacrum up towards the ceiling as you press your heels down into the floor.
Return your awareness into your ribs. Verify that you have not thrust them forward and insure they are down and inline with your pelvis. If you find you are able to maintain a neutral pelvis you can remove one of the props and see if this allows a greater stretch.
Key things to remember: The goal is to find length in the backside of your legs and relax your pelvic floor. The most common misunderstanding of the posture in this exercise is the alignment of the spine. Be sure not curl or round yourself forward in an effort to reach the chair.
If you are hyper mobile at the joints this stretch can be challenging to connect with. In this instance I encourage you to focus on lifting the scrum and pressing into your feet at the same time to emphasize more of a mind body connection with the backs of your legs.
42. Squats - 2 x 12
Day 8 - Meet Frank Einstein
If there is one exercise we all need to do more, it is the squat. A natural movement that we do perfectly as a child and then become less than perfect as we get older and sit more.
Core breath is added here. Inhale and expand on the way down, exhale to engage as you stand up. The exhale will begin right before you stand. It is common that people have a hard time connecting with the proper breathing pattern on this exercise, as well as feeling the contraction as they stand back up. This will change over time with practice and consistency. If you find yourself breathing the opposite way pause to reset your breath and resync.
Complete 2 set of 12 reps
There are a few variations that can be practiced depending on how much of a challenge you'd like. Even for the well seasoned exerciser using a chair can encourage a greater squat depth when this is practiced with slow controlled movements and the core breath connection.
Option #1: Sit to stand. You will stand a few inches in front of the chair with your feet pelvis width apart, toes pointed straight ahead and a gentle curve in your low back. Hands can be placed on your hips or extended out in from of you. Maintaining a neutral spine, press your hips back to lower yourself down on to the seat. Inhale as you lower yourself down. Be aware once you're seated not curl or tuck your pelvis under. Tucking can be prevented by keeping your shoulders stacked over the hips or slightly in front of them. From the seated position you will press your whole foot evenly into the floor to propel yourself back to standing. Exhaling on the way up.
Option #2: Squat with a bum tap onto the chair. This will follow the same instructions as above, but rather than sitting all the way down you will tap your hips onto the chair and then immediately return to a standing position. Inhale on the way down, exhale and engage on the way up.
Option #3: Squat with or without the assistance of the chair. If you choose to use the chair for balance step behind it so you can keep one hand on the chair back. Go through your same setup check points, width of the feet, toe position, weight distribution on the feet and neutral pelvis. Breathing in and keeping your gaze forward as you lower yourself down on to an invisible chair. Exhale and engage as you return to standing.
Key points to remember: The knee joint can be a cranky limiter. Often when we are experiencing discomfort it is because the muscles and ligaments surrounding the joint need to be strengthened. In the beginning of practicing a squat keeping your knees aligned over your ankles can help to minimize strain. Over time it is ok to let your knees start to move forward when they bend. This helps to strengthen your thigh muscles. Also being mindful that your knees and toes are pointed and moving the same direction, as well as keeping more weight in the back 2/3 of your feet will help reduce extra pressure you might feel in the joints.
43. Seated Ball Squeeze W/Rotation 1 x 12 (6 each direction)
Day 8 - Meet Frank Einstein
Working your core and pelvic floor is first about connecting and then about coordinating. This exercise brings in a lot of different elements— control, rotation, balance, arms and chest (and your brain!)... It looks easy but it's challenging, and it works!
Core breath added in to this exercise. Complete 1 set of 12 reps (6 in each direction)
Set up seated on your ball, feet hip width distance apart, neutral pelvis with a gentle curve in your low back and ribs down. With the ball held in between both hands extend your arms straight out in front of you at shoulder height. Adding in your core breath here, inhale to expand and then exhale to engage as you squeeze the ball and rotate to one side. Pause here while you inhale to expand and release the squeeze of the ball. Exhale to engage, squeezing the ball again and rotate back to the center. Repeat on the same side.
As mentioned above the challenge with this exercise is the breath and pelvic floor synchronization, along with the added movement of the torso and the squeeze and release of the ball. Just remember, when you hear me say inhale to expand your pelvic floor is blossoming and are staying relaxed. When I say exhale to engage you are contracting the pelvic floor muscles and picking up your blueberry.
44. Frankenstein Walk - 8 each direction
Day 8 - Meet Frank Einstein
No Core Breath in this exercise. Complete 5-8 steps in each direction.
Set up with a band positioned just above both knees. With gentle tension on the band your feet will be slightly wider than pelvis width distance and the toes pointed straight ahead. Hands placed on your hips.
Take a lateral step initiating from your hip, keeping both legs straight. Let the follow leg take a step to catch up, but maintain tension on the band. You can pretend you have an invisible box between your feet so that the feet are able to maintain the same distance with each step.
The trick here is to keep your legs straight and maintain flat feet as you step and land. The tendency will be to land on your toes first and then place your heel down... try to center your attention to landing on the outside of the foot. Also be mindful of "rocking in your pelvis". If you find that your hands are moving up and down while on your hips as you are stepping, place a little more attention into moving from the hip joint. Keeping your pelvis level during the exercise is a huge challenge! This exercise is to be a slow, controlled side stepping movements. Make sure you go both ways.
45. Supine Butterfly - 60 seconds
Day 8 - Meet Frank Einstein
Your inner thighs influence the pelvic floor. Take time to lengthen them so they can better help your core.
No core breath with this release.
Stay in this posture for 60 seconds. The main goal here is to be able to relax into this release. If you are feeling a deep stretch but it is causing tension in other parts of the body add a prop to modify.
Modification for this release can be done by placing pillows, yoga bolsters or blocks, rolled up towels or anything creative that you have at home under each leg. When placing a prop closer to the hip you will feel more support. As you move the support closer to the knees you will experience a greater level of stretch.
46. Belly Release - 60 seconds
Day 9 - Props for Props
No core breath with this exercise. Stay in this position for 60 seconds
Have you ever checked in with your belly and consciously thought about relaxing it? Holding the abs in all day is not serving you— it interferes with digestion and breathing and puts pressure on your pelvic floor. Let it go.
From a kneeling position come onto all fours. Knees will be pelvis width distance and lined up directly under the hips. Hands placed directly under your shoulders with your fingertips spread wide and neck remains long. Check in to confirm the gentle curve in your low back and that your ribs are still in line with the top of the pelvis.
Once you are in position you will empower the belly to gently expand towards the floor. It will remain expanded and relaxed. As you take a breath each time allow for a full expansion. These will be followed by a soft exhalation. No blueberries or pelvic floor engagement. This is to allow the belly to let go of tension, to relax and to release.
If this is challenging for your wrists there are a few things you can do to take some of the pressure off of the joints. First try pressing evenly into each finger tip. This helps to distribute the weight in the hands. Another option is to place a small towel under each palm to minimize the wrist flexion angle. If that doesn't help you can ball your fists and place your knuckles on the ground, being careful to maintain a straight line at the wrist angle.
For those needing an option off of the knees, this can be done standing with your hands placed on the seat of a chair. The most important thing to remember is that you will still need to arrange your posture as close to original exercise as possible. Hands directly under the shoulders but on the chair, feet will be pelvis width distance and lined up directly under the hips. Gentle cure in the low back and the bottom of the ribs in line with the top of the pelvis. From here allow the expansion of the belly as you breath.
47. Seated Ball Squeeze W/Rotation - 2 x 10
Day 9 - Props for Props
Working your core and pelvic floor is first about connecting and then about coordinating. This exercise brings in a lot of different elements— control, rotation, balance, arms and chest (and your brain!)... It looks easy but it's challenging, and it works!
Core breath added in to this exercise. Complete 2 sets of 10 reps (5 in each direction on both sides = 1 set)
Set up seated on your ball, feet hip width distance apart, neutral pelvis with a gentle curve in your low back and ribs down. With the ball held in between both hands extend your arms straight out in front of you at shoulder height. Adding in your core breath here, inhale to expand and then exhale to engage as you squeeze the ball and rotate to one side. Pause here while you inhale to expand and release the squeeze of the ball. Exhale to engage, squeezing the ball again and rotate back to the center. Repeat on the same side.
As mentioned above the challenge with this exercise is the breath and pelvic floor synchronization, along with the added movement of the torso and the squeeze and release of the ball. Just remember, when you hear me say inhale to expand your pelvic floor is blossoming and are staying relaxed. When I say exhale to engage you are contracting the pelvic floor muscles and picking up your blueberry.
48. Hip Raise W/Ball - 2 x 15
Day 9 - Props for Props
Complete 2 sets of 15 reps
Core control starts with the pelvic floor. This move fires up the backs of the legs and challenges your balance.
Set yourself up with the ball placed under your feet and calves. Adding in your core breath, you will inhale to expand, exhale to engage lifting your pelvic floor as you raise your hips up towards the ceiling. Inhale to expand as you lower yourself back down to your start position. This counts as 1 repetition.
I've added in a few progressions below if you feel like you want to more of a challenge. Pick the one that works best for your body and the level you are at today.
------------------------------------------------------------------------------------------------------------------------------
Progression #1: You will bend your knees while the hips are elevated, curling the ball towards your bum. Then lower your hips back to the floor and extend the legs to return to your start position. This is 1 repetition. Repeat 2x15
Your breathing pattern will be as follows: Inhale to prepare, exhale to engage lifting the hips. Inhale-expand as you pause. Exhale to engage, curling the ball towards your bum. Inhale to expand and lower yourself back to the floor. Reset for your next repetition.
------------------------------------------------------------------------------------------------------------------------------
Progression #2 : Hips will remain elevated as you curl the ball towards your bum, followed by extending and straightening the legs. This is 1 repetition. Repeat 2x15
Breathing pattern will be as follows: Inhale to prepare. Exhale and engage as you lift your hips up. Inhale and expand with your pause. Exhale-engage curling the ball towards your bum. Inhale and expand maintaining elevated hips. Exhale and engage extending the legs back out away from the hips.
------------------------------------------------------------------------------------------------------------------------------
Progression #3: Now we will bring it all together. This option will follow the same movement instructions as #2, but we will be moving through the exercise quicker. This encourages an added core breath challenge. Repeat 2x15
Inhale and expand to prepare. Exhale to engage as you lift the hips up and curl the ball towards your bum. Inhale and expand as you expand the legs back out away from your body. This complete move is 1 repetition. Remember to keep those hips up!
49. Pushup W/Ball - 1 x 10
Day 9 - Props for Props
A great exercise for those that want some good upper body but don't like being on their knees or find the straight leg ones a bit too much. This is a great option for women with prolapse or those who find push ups bring on symptoms like leaking.
Core breath here. Complete 1 set of 10 reps
Starting on your mat with the stability ball in font of you touching your thighs. Gently lower yourself down so that your pelvis and abdomen are on the ball. Place your hands on the ground and slowly walk yourself forward until your feet are off the ground and you are balancing on the ball with your legs extended back.
Wrists are slightly wider than shoulder width distance. Keep your pelvis in neutral and have a strong energy line from the crown of your head through the tips of the toes. This keeps your body in a strong posture.
Inhale to expand as you lower yourself down. Exhale to engage as you press yourself back up.
Points to remember with a pushup: keep your elbows pointed slightly back. Anywhere from a 60-45 degree angle will protect your shoulders.
This exercise can be altered by changing your body's position on the ball. For a modification walk your hands back closer to the ball to create a shorter level. Or you can walk your hands further away from the ball to create more of a challenge.
50. Thoracic Release - 60 seconds
Day 9 - Props for Props
Find length and space in your upper back, shoulders and side body so you can breathe better and therefore kegel better!
No core breath added here. Stay in this posture for 60 seconds.
Start by kneeling with the ball in front of you on your mat. Toes can be tucked or top sides of the feet can remain flat on the floor if this is more comfortable. Push the ball away to allow a lengthening in your arms and side body. Arms should remain straight. If you feel a shoulder impingement or discomfort spread the arms a bit wider on the ball.
Let your hips sink back on to your heels and check in with your ribs to confirm they have not become thrust forward, causing an overarching of the low back. Take a few moments here and allow your body to bring in more length with each breath.
You can make this release more dynamic by slowly rotating the torso on the ball from side to side, attempting to gain more length in your side body. Another option is to lift your bum off of your heels and move your arms forward and back on the ball rather than side to side.
51. Posterior Pelvic Floor Release - 30 seconds/side
Day 10 - Perfecting Your Technique
Release tension in your glutes and hear your pelvic floor sigh.
30 seconds per side. No core breath with this release.
You will need a hard surface so the ball does not sink into the chair.
Place the ball between your sitz bone and your anus.
Maintain relaxed breathing as you let yourself sink further into the ball with each breath. You are looking to create space and let go of any tension you may be holding.
52. Frankenstein Walk - 8 each direction
Day 10 - Perfecting Your Technique
No Core Breath in this exercise. Complete 5-8 steps in each direction.
Set up with a band positioned just above both knees. With gentle tension on the band your feet will be slightly wider than pelvis width distance and the toes pointed straight ahead. Hands placed on your hips.
Take a lateral step initiating from your hip, keeping both legs straight. Let the follow leg take a step to catch up, but maintain tension on the band. You can pretend you have an invisible box between your feet so that the feet are able to maintain the same distance with each step.
The trick here is to keep your legs straight and maintain flat feet as you step and land. The tendency will be to land on your toes first and then place your heel down... try to center your attention to landing on the outside of the foot. Also be mindful of "rocking in your pelvis". If you find that your hands are moving up and down while on your hips as you are stepping, place a little more attention into moving from the hip joint. Keeping your pelvis level during the exercise is a huge challenge! This exercise is to be a slow, controlled side stepping movements. Make sure you go both ways.
53. Squats - 2 x 10
Day 10 - Perfecting Your Technique
If there is one exercise we all need to do more, it is the squat. A natural movement that we do perfectly as a child and then become less than perfect as we get older and sit more.
Core breath is added here. Inhale and expand on the way down, exhale to engage as you stand up. The exhale will begin right before you stand. It is common that people have a hard time connecting with the proper breathing pattern on this exercise, as well as feeling the contraction as they stand back up. This will change over time with practice and consistency. If you find yourself breathing the opposite way pause to reset your breath and resync.
Complete 2 set of 10 reps
There are a few variations that can be practiced depending on how much of a challenge you'd like. Even for the well seasoned exerciser using a chair can encourage a greater squat depth when this is practiced with slow controlled movements and the core breath connection.
Option #1: Sit to stand. You will stand a few inches in front of the chair with your feet pelvis width apart, toes pointed straight ahead and a gentle curve in your low back. Hands can be placed on your hips or extended out in from of you. Maintaining a neutral spine, press your hips back to lower yourself down on to the seat. Inhale as you lower yourself down. Be aware once you're seated not curl or tuck your pelvis under. Tucking can be prevented by keeping your shoulders stacked over the hips or slightly in front of them. From the seated position you will press your whole foot evenly into the floor to propel yourself back to standing. Exhaling on the way up.
Option #2: Squat with a bum tap onto the chair. This will follow the same instructions as above, but rather than sitting all the way down you will tap your hips onto the chair and then immediately return to a standing position. Inhale on the way down, exhale and engage on the way up.
Option #3: Squat with or without the assistance of the chair. If you choose to use the chair for balance step behind it so you can keep one hand on the chair back. Go through your same setup check points, width of the feet, toe position, weight distribution on the feet and neutral pelvis. Breathing in and keeping your gaze forward as you lower yourself down on to an invisible chair. Exhale and engage as you return to standing.
Key points to remember: The knee joint can be a cranky limiter. Often when we are experiencing discomfort it is because the muscles and ligaments surrounding the joint need to be strengthened. In the beginning of practicing a squat keeping your knees aligned over your ankles can help to minimize strain. Over time it is ok to let your knees start to move forward when they bend. This helps to strengthen your thigh muscles. Also being mindful that your knees and toes are pointed and moving the same direction, as well as keeping more weight in the back 2/3 of your feet will help reduce extra pressure you might feel in the joints.
54. Bridge - 2 x 15
Day 10 - Perfecting Your Technique
Glutes and the pelvic floor are BFF's - great glutes means a great pelvic floor too!
Set yourself up on a flat surface, on your back with your knees bent and your shins close to vertical. For tighter hamstrings or knee limitations you may need to walk your feet slightly further away from your bum.
Inhale to expand, exhale to engage (core breath) as you lift your hips evenly up toward the ceiling. Inhale to expand as you lower yourself back down and repeat.
Key things to remember with this exercise, keep your weight evenly distributed in your feet, knees will stay pointed straight and aligned with your hip bones-do not let them move inward and outward, press the back of your palms, arms and shoulders into the floor. This helps keep your chest open.
Complete 2 sets of 15 reps.
55. Stacked Butterfly - 30 seconds/side
Day 10 - Perfecting Your Technique
Oh those hips! How they love this pose! (Inner thighs too!)
No core breath. 30 seconds each side. Prop needed: Yoga block, small pillow or a rolled up towel. (just one of these options is necessary)
Lying on your back with your head and neck in neutral, allow your right knee to fall out to the side maintaining a flexed ankle.
Now place your left ankle, also flexed, in the nook that separates the top of your right calf and your right knee. From here allow the top knee to gently open towards the floor. Here is where you will place your prop under the left hip for some extra support. Reminder that this should feel relaxing and you are seeking a gentle stretch.
If stacking the foot in the nook feels like too much of a stretch to begin you can work your way into this pose. Your setup will be the same, but you can place the top foot on top of the bottom ankle and then work your way up the leg from there. As your hips begin to open and you settle into the pose you can adjust your foot placement by moving it closer to the knee.
Key point to remember: maintain ankle flexion on both sides. Ankle flexion= top of foot pulled towards the knees.
56. Bonus Content - Prolapse Lifestyle Modifications
Day 10 - Perfecting Your Technique
57. Bonus Content - Prolapse - What To Do
Day 10 - Perfecting Your Technique
59. Pushup W/Ball - 2 x 10
Day 11 - Balls Are Fun
A great exercise for those that want some good upper body but don't like being on their knees or find the straight leg ones a bit too much. This is a great option for women with prolapse or those who find push ups bring on symptoms like leaking.
Core breath here. Complete 2 sets of 10 reps
Starting on your mat with the stability ball in font of you touching your thighs. Gently lower yourself down so that your pelvis and abdomen are on the ball. Place your hands on the ground and slowly walk yourself forward until your feet are off the ground and you are balancing on the ball with your legs extended back.
Wrists are slightly wider than shoulder width distance. Keep your pelvis in neutral and have a strong energy line from the crown of your head through the tips of the toes. This keeps your body in a strong posture.
Inhale to expand as you lower yourself down. Exhale to engage as you press yourself back up.
Points to remember with a pushup: keep your elbows pointed slightly back. Anywhere from a 60-45 degree angle will protect your shoulders.
This exercise can be altered by changing your body's position on the ball. For a modification walk your hands back closer to the ball to create a shorter level. Or you can walk your hands further away from the ball to create more of a challenge.
60. One Leg Stand - 1 x 10
Day 11 - Balls Are Fun
I know, this looks like a bit of a wimpy exercise right? I get it... but when you slow things down and when you add in the core breath it is more challenging than it looks. The focus here is working on the lateral stabilizers in the hips — pretty important for core control.
Complete 1 x 10 reps per side
Start out standing on your mat with your feet parallel to each other and placed pelvis width apart. Ensure your pelvis is in neutral with a gentle curve in your low back and ribs drawn down. Place your hands on your hips. Inhale to expand, exhale to engage as you slowly lift one foot off the floor 2-3 inches. Inhale to expand as you lower that foot back to the floor and then repeat with the opposite side.
This exercise can be modified by standing with your backside close to a wall, so you feel the safety of something behind you to assist with balance. You also have the option of placing a chair to one side of you where you can hold on to it if needed.
Note: Try this with your shoes and socks off. Wearing shoes can negatively impact your ability to balance during this exercise. Going barefoot encourages greater muscle recruitment in the feet, ankles, calves and all the way up the leg.
61. Frankenstein Walk - 2 x 8
Day 11 - Balls Are Fun
No Core Breath in this exercise. Complete 2 sets of 8 reps in each direction.
Set up with a band positioned just above both knees. With gentle tension on the band your feet will be slightly wider than pelvis width distance and the toes pointed straight ahead. Hands placed on your hips.
Take a lateral step initiating from your hip, keeping both legs straight. Let the follow leg take a step to catch up, but maintain tension on the band. You can pretend you have an invisible box between your feet so that the feet are able to maintain the same distance with each step.
The trick here is to keep your legs straight and maintain flat feet as you step and land. The tendency will be to land on your toes first and then place your heel down... try to center your attention to landing on the outside of the foot. Also be mindful of "rocking in your pelvis". If you find that your hands are moving up and down while on your hips as you are stepping, place a little more attention into moving from the hip joint. Keeping your pelvis level during the exercise is a huge challenge! This exercise is to be a slow, controlled side stepping movements. Make sure you go both ways.
62. Supine Butterfly - 60 seconds
Day 11 - Balls Are Fun
When you're done with today's workout, head over to the chat... I want to know what your favorite exercise is so far!
Your inner thighs influence the pelvic floor. Take time to lengthen them so they can better help your core.
No core breath with this release.
Stay in this posture for 60 seconds. The main goal here is to be able to relax into this release. If you are feeling a deep stretch but it is causing tension in other parts of the body add a prop to modify.
Modification for this release can be done by placing pillows, yoga bolsters or blocks, rolled up towels or anything creative that you have at home under each leg. When placing a prop closer to the hip you will feel more support. As you move the support closer to the knees you will experience a greater level of stretch.
63. Standing Hamstring Release - 60 seconds
Day 12 - Monster Mash
It's all about creating length in the hamstrings while the pelvis is in neutral — this will translate into being able to find and stay in neutral more often which will make your pelvic floor very happy!
Props needed: Chair and anything that you can use to bring the seat of the chair up closer to you. Options: blocks, pillows, yoga bolster, rolled up towels or folded blankets.
No core breath here. Stay in this position for 30-60 seconds.
You will set up by standing with your feet pelvis width apart, toes pointed straight ahead, neutral spine which includes a gentle curve in your low back. Ribs are down so that they stay in line with the top of the pelvis. From here you will gradually fold yourself forward, hinging at the hip joint (crease at the top of your legs) and place your arms at the top of the stack on the chair. Your legs will remain straight but knees are not locked.
Feel for the curve in your low back, imagine you are pulling your sacrum up towards the ceiling as you press your heels down into the floor.
Return your awareness into your ribs. Verify that you have not thrust them forward and insure they are down and inline with your pelvis. If you find you are able to maintain a neutral pelvis you can remove one of the props and see if this allows a greater stretch.
Key things to remember: The goal is to find length in the backside of your legs and relax your pelvic floor. The most common misunderstanding of the posture in this exercise is the alignment of the spine. Be sure not curl or round yourself forward in an effort to reach the chair.
If you are hyper mobile at the joints this stretch can be challenging to connect with. In this instance I encourage you to focus on lifting the scrum and pressing into your feet at the same time to emphasize more of a mind body connection with the backs of your legs.
64. One Leg Stand - 1 x 12
Day 12 - Monster Mash
I know, this looks like a bit of a wimpy exercise right? I get it... but when you slow things down and when you add in the core breath it is more challenging than it looks. The focus here is working on the lateral stabilizers in the hips — pretty important for core control.
Complete 1 x 12 reps per side
Start out standing on your mat with your feet parallel to each other and placed pelvis width apart. Ensure your pelvis is in neutral with a gentle curve in your low back and ribs drawn down. Place your hands on your hips. Inhale to expand, exhale to engage as you slowly lift one foot off the floor 2-3 inches. Inhale to expand as you lower that foot back to the floor and then repeat with the opposite side.
This exercise can be modified by standing with your backside close to a wall, so you feel the safety of something behind you to assist with balance. You also have the option of placing a chair to one side of you where you can hold on to it if needed.
Note: Try this with your shoes and socks off. Wearing shoes can negatively impact your ability to balance during this exercise. Going barefoot encourages greater muscle recruitment in the feet, ankles, calves and all the way up the leg.
65. Monster Walk - 5 each direction
Day 12 - Monster Mash
It's like side stepping and walking in a squat— sounds fun right? Don't worry about adding the core breath here, just go as low as you can, and walk side to side and forward... and then back... and feel the burn!
No Core Breath in this exercise. Complete 5-8 steps in each direction.
Set up with a band positioned just above both knees. With gentle tension on the band your feet will be slightly wider than pelvis width distance and the toes pointed straight ahead. Hands placed on your hips or in front of you to help counter balance. Squat down as if you're going to sit in an invisible chair, hinge at the hips, send your bum back and make sure your pelvis does not tuck under. From there take a lateral steps, initiating from your hip. Let the follow leg take a step to catch up, but maintain tension on the band.
Once you've completed your lateral steps you can turn and face forward with the same set up, remaining in your squat. Go through your check points to make sure you are still in a good squat position and the pelvis is in neutral. Keeping the feet and knees aligned walk forward 5-8 steps while staying low, followed by taking the same number of steps walking backwards.
This can be modified by not sitting as deeply into the squat posture. Or made more challenging by sending the hips lower in your squat.
66. Bridge - 2 x 15
Day 12 - Monster Mash
Glutes and the pelvic floor are BFF's - great glutes means a great pelvic floor too!
Set yourself up on a flat surface, on your back with your knees bent and your shins close to vertical. For tighter hamstrings or knee limitations you may need to walk your feet slightly further away from your bum.
Inhale to expand, exhale to engage (core breath) as you lift your hips evenly up toward the ceiling. Inhale to expand as you lower yourself back down and repeat.
Key things to remember with this exercise, keep your weight evenly distributed in your feet, knees will stay pointed straight and aligned with your hip bones-do not let them move inward and outward, press the back of your palms, arms and shoulders into the floor. This helps keep your chest open.
Complete 2 sets of 15 reps.
67. Psoas Release - 5 mins
Day 12 - Monster Mash
A tight psoas can tuck the pelvis under, it can thrust the ribs forward and pulls the low back into an exaggerated curve. All of this can interfere with optimal core and pelvic floor function so taking time to really let the psoas find length and suppleness is a good thing. For those with an already exaggerated curve in your low back this is a great pose to add into your routine.
Props needed: Bolster or a blanket folded into a rectangle shape thick enough to create space between your ribs and the floor when you lay dow. Additionally a small pillow or towel for your head if needed.
No core breath. Stay here 5 minutes
Set up: Lower yourself down so that the bottom edge of the elevated surface is between your shoulder blades and just above your bra strap. Laying on your back, extend your legs straight out. It's ok to let your feet and legs relax and roll out to the sides. Here you can add the pillow under your head to help maintain a neutral neck position.
As you are settling into the release check in with your pelvis and make sure your pubic joint is in the same plane as your 2 hip bones. You can do this by placing your hands on the front of your pelvis and your fingertips at pubic joint. From here take your hands and feel the space between your back ribs and the floor. You want to have space to allow the ribs to sink down towards your mat. Take note, as this is your starting point. Extend your arms out to the sides and relax in this space. Periodically checking under your torso to feel if the space between you and the floor is decreasing as your ribs start to sink.
To exit the pose roll to one side and press yourself up to seated position with your hands.
68. Belly Release - 60 seconds
Day 13 - Don't Be Scared
No core breath with this exercise. Stay in this position for 60 seconds
Have you ever checked in with your belly and consciously thought about relaxing it? Holding the abs in all day is not serving you— it interferes with digestion and breathing and puts pressure on your pelvic floor. Let it go.
From a kneeling position come onto all fours. Knees will be pelvis width distance and lined up directly under the hips. Hands placed directly under your shoulders with your fingertips spread wide and neck remains long. Check in to confirm the gentle curve in your low back and that your ribs are still in line with the top of the pelvis.
Once you are in position you will empower the belly to gently expand towards the floor. It will remain expanded and relaxed. As you take a breath each time allow for a full expansion. These will be followed by a soft exhalation. No blueberries or pelvic floor engagement. This is to allow the belly to let go of tension, to relax and to release.
If this is challenging for your wrists there are a few things you can do to take some of the pressure off of the joints. First try pressing evenly into each finger tip. This helps to distribute the weight in the hands. Another option is to place a small towel under each palm to minimize the wrist flexion angle. If that doesn't help you can ball your fists and place your knuckles on the ground, being careful to maintain a straight line at the wrist angle.
For those needing an option off of the knees, this can be done standing with your hands placed on the seat of a chair. The most important thing to remember is that you will still need to arrange your posture as close to original exercise as possible. Hands directly under the shoulders but on the chair, feet will be pelvis width distance and lined up directly under the hips. Gentle cure in the low back and the bottom of the ribs in line with the top of the pelvis. From here allow the expansion of the belly as you breath.
69. Monster Walk - 8 each direction
Day 13 - Don't Be Scared
It's like side stepping and walking in a squat— sounds fun right? Don't worry about adding the core breath here, just go as low as you can, and walk side to side and forward... and then back... and feel the burn!
No Core Breath in this exercise. Complete 8 steps in each direction.
Set up with a band positioned just above both knees. With gentle tension on the band your feet will be slightly wider than pelvis width distance and the toes pointed straight ahead. Hands placed on your hips or in front of you to help counter balance. Squat down as if you're going to sit in an invisible chair, hinge at the hips, send your bum back and make sure your pelvis does not tuck under. From there take a lateral steps, initiating from your hip. Let the follow leg take a step to catch up, but maintain tension on the band.
Once you've completed your lateral steps you can turn and face forward with the same set up, remaining in your squat. Go through your check points to make sure you are still in a good squat position and the pelvis is in neutral. Keeping the feet and knees aligned walk forward 5-8 steps while staying low, followed by taking the same number of steps walking backwards.
This can be modified by not sitting as deeply into the squat posture. Or made more challenging by sending the hips lower in your squat.
70. Frankenstein Walk - 10 each direction
Day 13 - Don't Be Scared
The trick here is to keep your legs straight and land on the outside edges of your foot with your foot flat. The tendency will be to land on your toe first and then put your heel down... try to land on the entire foot at once. Slow, controlled side stepping movements. Make sure you go both ways.
No Core Breath in this exercise.
Complete 10 in each direction
71. Squats - 1 x 15
Day 13 - Don't Be Scared
If there is one exercise we all need to do more, it is the squat. A natural movement that we do perfectly as a child and then become less than perfect as we get older and sit more.
Core breath is added here. Inhale and expand on the way down, exhale to engage as you stand up. The exhale will begin right before you stand. It is common that people have a hard time connecting with the proper breathing pattern on this exercise, as well as feeling the contraction as they stand back up. This will change over time with practice and consistency. If you find yourself breathing the opposite way pause to reset your breath and resync.
Complete 1 set of 15 reps
There are a few variations that can be practiced depending on how much of a challenge you'd like. Even for the well seasoned exerciser using a chair can encourage a greater squat depth when this is practiced with slow controlled movements and the core breath connection.
Option #1: Sit to stand. You will stand a few inches in front of the chair with your feet pelvis width apart, toes pointed straight ahead and a gentle curve in your low back. Hands can be placed on your hips or extended out in from of you. Maintaining a neutral spine, press your hips back to lower yourself down on to the seat. Inhale as you lower yourself down. Be aware once you're seated not curl or tuck your pelvis under. Tucking can be prevented by keeping your shoulders stacked over the hips or slightly in front of them. From the seated position you will press your whole foot evenly into the floor to propel yourself back to standing. Exhaling on the way up.
Option #2: Squat with a bum tap onto the chair. This will follow the same instructions as above, but rather than sitting all the way down you will tap your hips onto the chair and then immediately return to a standing position. Inhale on the way down, exhale and engage on the way up.
Option #3: Squat with or without the assistance of the chair. If you choose to use the chair for balance step behind it so you can keep one hand on the chair back. Go through your same setup check points, width of the feet, toe position, weight distribution on the feet and neutral pelvis. Breathing in and keeping your gaze forward as you lower yourself down on to an invisible chair. Exhale and engage as you return to standing.
Key points to remember: The knee joint can be a cranky limiter. Often when we are experiencing discomfort it is because the muscles and ligaments surrounding the joint need to be strengthened. In the beginning of practicing a squat keeping your knees aligned over your ankles can help to minimize strain. Over time it is ok to let your knees start to move forward when they bend. This helps to strengthen your thigh muscles. Also being mindful that your knees and toes are pointed and moving the same direction, as well as keeping more weight in the back 2/3 of your feet will help reduce extra pressure you might feel in the joints.
72. Stacked Butterfly - 30 seconds/side
Day 13 - Don't Be Scared
Oh those hips! How they love this pose! (Inner thighs too!)
No core breath. 30 seconds each side. Prop needed: Yoga block, small pillow or a rolled up towel. (just one of these options is necessary)
Lying on your back with your head and neck in neutral, allow your right knee to fall out to the side maintaining a flexed ankle.
Now place your left ankle, also flexed, in the nook that separates the top of your right calf and your right knee. From here allow the top knee to gently open towards the floor. Here is where you will place your prop under the left hip for some extra support. Reminder that this should feel relaxing and you are seeking a gentle stretch.
If stacking the foot in the nook feels like too much of a stretch to begin you can work your way into this pose. Your setup will be the same, but you can place the top foot on top of the bottom ankle and then work your way up the leg from there. As your hips begin to open and you settle into the pose you can adjust your foot placement by moving it closer to the knee.
Key point to remember: maintain ankle flexion on both sides. Ankle flexion= top of foot pulled towards the knees.
73. Hamstring Stretch W/Strap - 30 seconds/side
Day 14 - Level Up Your Kegels
A common 'cheat' in this exercise is to allow the low back to flatten against the floor which gives the illusion of more 'length' in the hamstrings. Keep the pelvis neutral and only lift the leg as high as you can without the pelvis tipping back. The stretch may not be as strong but you are gaining valuable length that will serve your posture well.
Props needed: Yoga strap or long scarf, small pillow for your head. No core breath. Hold for 30 seconds each side
Start out laying down with the pillow placed under your head for a neutral neck. Extend one leg straight out on to your mat and wrap the strap around the ball of the opposite foot, before eventually straightening that leg.
From here lower the leg about half way to the floor while holding the ends of the strap in your hands. Check in to ensure a your pubic joint and the top of your pelvis are in the same plane.
Maintaining straight knees on both legs, begin slowly pulling the band to bring the leg up. Keep extending through the heel of the elevated leg, looking for length. Once again, check in with your pelvis to make sure you are not gaining length in the elevated leg by accidentally tucking your pelvis and flattening your back against the floor.
Key points: This release is not about how high you can move your leg towards the ceiling, it's about maintaining a neutral pelvis while still finding length in the back of the leg. It may help to imagine you are extending through the heel of the leg in the air and pulling the hip down in the direction of the floor. This allows your body to create length from 2 directions. Additionally, the backside of the leg on the mat needs to stay in contact with the floor. You can place a rolled up towel under the knee if needed for comfort.
74. Seated March - 1 x 10
Day 14 - Level Up Your Kegels
Harder than it looks. Lifting the foot off the floor creates instability — can you do it without allowing the ball to roll or your pelvis to drop? It is just a small lift — about 2-3 inches... any higher and it will start to tilt your pelvis back so keep your range small.
Adding the core breath. Inhale and expand to prepare, exhale and engage as you lift the foot, inhale and expand as you set the foot back down, exhale and engage as you lift.....repeat.
Complete 1 set of 10 reps (5 per side)
A few options for modifications: you can move the ball into the corner of a room so you feel safely wedged between 2 walls. Another option is only lifting the heel of 1 foot if you feel like you still need 2 points of contact on the ground. You can also perform this in a chair as you work your way up to a greater balance challenge on the ball.
75. One Leg Bridge - 1 x 10 per side
Day 14 - Level Up Your Kegels
Remember the bridge? Well now you are going to do it with 1 leg lifted. The key here is to keep the pelvis neutral and don't let one side drop as you lift one foot off of the ground. There are a few variations so you can try them out and see what your body likes best.
Core breath added. Complete 1 set of 10 reps per side.
Set yourself up on a flat surface, on your back with your knees bent and your shins close to vertical. For tighter hamstrings or knee limitations you may need to walk your feet slightly further away from your bum.
Option #1: Extend one leg up towards the ceiling and do repeats of the hip up and down motion staying on that same side for 10 repetitions. Your core breath will be as follows: Inhale to expand, exhale to engage as you lift the leg up towards the ceiling. Inhale to expand, exhale to engage as you bring your hips up, inhale to expand on your way down.
Option #2: Start with both feet planted, move into your bridge and then extend 1 leg out and back before you return your hips to the mat. Your core breath will be as follows: Inhale to expand, exhale to engage as you lift your hips evenly up toward the ceiling and extend the leg out. Inhale to expand as you bring the leg in and lower yourself back down.
Key points: knee of the foot planted will stay pointed straight and aligned with your hip bones-do not let it move inward and outward, press the back of your palms, arms and shoulders into the floor. This helps keep your chest open.
76. Pushup W/Ball - 1 x 10
Day 14 - Level Up Your Kegels
A great exercise for those that want some good upper body but don't like being on their knees or find the straight leg ones a bit too much. This is a great option for women with prolapse or those who find push ups bring on symptoms like leaking.
Core breath here. Complete 1 set of 10 reps
Starting on your mat with the stability ball in font of you touching your thighs. Gently lower yourself down so that your pelvis and abdomen are on the ball. Place your hands on the ground and slowly walk yourself forward until your feet are off the ground and you are balancing on the ball with your legs extended back.
Wrists are slightly wider than shoulder width distance. Keep your pelvis in neutral and have a strong energy line from the crown of your head through the tips of the toes. This keeps your body in a strong posture.
Inhale to expand as you lower yourself down. Exhale to engage as you press yourself back up.
Points to remember with a pushup: keep your elbows pointed slightly back. Anywhere from a 60-45 degree angle will protect your shoulders.
This exercise can be altered by changing your body's position on the ball. For a modification walk your hands back closer to the ball to create a shorter level. Or you can walk your hands further away from the ball to create more of a challenge.
77. Thoracic Release - 60 seconds
Day 14 - Level Up Your Kegels
Way to go! We're officially at the halfway mark. Have you noticed any improvements yet? When you're finished this release, head over to the chat to let us know how you're doing!
Find length and space in your upper back, shoulders and side body so you can breathe better and therefore kegel better!
No core breath added here. Stay in this posture for 60 seconds.
Start by kneeling with the ball in front of you on your mat. Toes can be tucked or top sides of the feet can remain flat on the floor if this is more comfortable. Push the ball away to allow a lengthening in your arms and side body. Arms should remain straight. If you feel a shoulder impingement or discomfort spread the arms a bit wider on the ball.
Let your hips sink back on to your heels and check in with your ribs to confirm they have not become thrust forward, causing an overarching of the low back. Take a few moments here and allow your body to bring in more length with each breath.
You can make this release more dynamic by slowly rotating the torso on the ball from side to side, attempting to gain more length in your side body. Another option is to lift your bum off of your heels and move your arms forward and back on the ball rather than side to side.
78. Thoracic Stretch - 60 seconds
Day 15 - Core, Floor & More
Find length and space in your upper back, shoulders and side body so you can breathe better and therefore kegel better!
No core breath added here. Stay in this posture for 60 seconds.
Start by kneeling with the ball in front of you on your mat. Toes can be tucked or top sides of the feet can remain flat on the floor if this is more comfortable. Push the ball away to allow a lengthening in your arms and side body. Arms should remain straight. If you feel a shoulder impingement or discomfort spread the arms a bit wider on the ball.
Let your hips sink back on to your heels and check in with your ribs to confirm they have not become thrust forward, causing an overarching of the low back. Take a few moments here and allow your body to bring in more length with each breath.
You can make this release more dynamic by slowly rotating the torso on the ball from side to side, attempting to gain more length in your side body. Another option is to lift your bum off of your heels and move your arms forward and back on the ball rather than side to side.
79. Pelvic Tilt - 2 x 15
Day 15 - Core, Floor & More
Add the core breath to this simple move to ignite your pelvic floor!
Inhale to expand, then exhale to engage (core breath) as you curl pelvis, pressing your low back into the mat. Inhale to expand as you return to neutral spine, exhale to engage as you curl your pelvis, repeat..
Complete 2 sets of 15 reps
80. One Leg Bridge - 1 x 12
Day 15 - Core, Floor & More
Remember the bridge? Well now you are going to do it with 1 leg lifted. The key here is to keep the pelvis neutral and don't let one side drop as you lift one foot off of the ground. There are a few variations so you can try them out and see what your body likes best.
Core breath added. Complete 1 set of 12 reps per side.
Set yourself up on a flat surface, on your back with your knees bent and your shins close to vertical. For tighter hamstrings or knee limitations you may need to walk your feet slightly further away from your bum.
Option #1: Extend one leg up towards the ceiling and do repeats of the hip up and down motion staying on that same side for 10 repetitions. Your core breath will be as follows: Inhale to expand, exhale to engage as you lift the leg up towards the ceiling. Inhale to expand, exhale to engage as you bring your hips up, inhale to expand on your way down.
Option #2: Start with both feet planted, move into your bridge and then extend 1 leg out and back before you return your hips to the mat. Your core breath will be as follows: Inhale to expand, exhale to engage as you lift your hips evenly up toward the ceiling and extend the leg out. Inhale to expand as you bring the leg in and lower yourself back down.
Key points: knee of the foot planted will stay pointed straight and aligned with your hip bones-do not let it move inward and outward, press the back of your palms, arms and shoulders into the floor. This helps keep your chest open.
81. Supine Isometric Thigh Press - 1 x 10/side
Day 15 - Core, Floor & More
A nice slow, controlled core engagement exercise that gives you the burn you love when working your abs. Isometric means a contraction that is held statically instead of contracting through movement.
Core breath here. Complete 1 set of 10 reps per side (20 total)
Set yourself up on a flat surface, on your back with your knees bent and your shins close to vertical. For tighter hamstrings or knee limitations you may need to walk your feet slightly further away from your bum. Place a small towel under your head for a neutral neck if needed. Check in to make sure you have a neutral pelvis with your ribs down and gentle curve in your low back.
Inhale to expand, exhale to engage as you press your right hand into your right thigh (right foot is elevated) Inhale to expand as you set the foot back to the floor. Repeat with the left side. (left hand to left knee)
Progression: right hand will press into the left knee and you will alternate from side to side. Core breath will remain the same, inhale to expand, exhale to engage while you press hand to thigh.
82. Psoas Release - 5 mins
Day 15 - Core, Floor & More
A tight psoas can tuck the pelvis under, it can thrust the ribs forward and pulls the low back into an exaggerated curve. All of this can interfere with optimal core and pelvic floor function so taking time to really let the psoas find length and suppleness is a good thing. For those with an already exaggerated curve in your low back this is a great pose to add into your routine.
Props needed: Bolster or a blanket folded into a rectangle shape thick enough to create space between your ribs and the floor when you lay dow. Additionally a small pillow or towel for your head if needed.
No core breath. Stay here 5 minutes
Set up: Lower yourself down so that the bottom edge of the elevated surface is between your shoulder blades and just above your bra strap. Laying on your back, extend your legs straight out. It's ok to let your feet and legs relax and roll out to the sides. Here you can add the pillow under your head to help maintain a neutral neck position.
As you are settling into the release check in with your pelvis and make sure your pubic joint is in the same plane as your 2 hip bones. You can do this by placing your hands on the front of your pelvis and your fingertips at pubic joint. From here take your hands and feel the space between your back ribs and the floor. You want to have space to allow the ribs to sink down towards your mat. Take note, as this is your starting point. Extend your arms out to the sides and relax in this space. Periodically checking under your torso to feel if the space between you and the floor is decreasing as your ribs start to sink.
To exit the pose roll to one side and press yourself up to seated position with your hands.
83. Bonus Content - Pelvic Floor Physiotherapy
Day 15 - Core, Floor & More
We should all be going once a year - like the dentist.
84. Posterior Pelvic Floor Release - 30 seconds/side
Day 16 - Crunchless Core
Release tension in your glutes and hear your pelvic floor sigh.
30 seconds per side. No core breath with this release.
You will need a hard surface so the ball does not sink into the chair.
Place the ball between your sitz bone and your anus.
Maintain relaxed breathing as you let yourself sink further into the ball with each breath. You are looking to create space and let go of any tension you may be holding.
85. Supine Isometric Thigh Press - 1 x 12/side
Day 16 - Crunchless Core
A nice slow, controlled core engagement exercise that gives you the burn you love when working your abs. Isometric means a contraction that is held statically instead of contracting through movement.
Core breath here. Complete 1 set of 12 reps per side
Set yourself up on a flat surface, on your back with your knees bent and your shins close to vertical. For tighter hamstrings or knee limitations you may need to walk your feet slightly further away from your bum. Place a small towel under your head for a neutral neck if needed. Check in to make sure you have a neutral pelvis with your ribs down and gentle curve in your low back.
Inhale to expand, exhale to engage as you press your right hand into your right thigh (right foot is elevated) Inhale to expand as you set the foot back to the floor. Repeat with the left side. (left hand to left knee)
Progression: right hand will press into the left knee and you will alternate from side to side. Core breath will remain the same, inhale to expand, exhale to engage while you press hand to thigh.
86. Seated Ball Squeeze w/Rotation - 1 x 20 (10 per side)
Day 16 - Crunchless Core
Working your core and pelvic floor is first about connecting and then about coordinating. This exercise brings in a lot of different elements— control, rotation, balance, arms and chest (and your brain!)... It looks easy but it's challenging, and it works!
Core breath added in to this exercise. Complete 1 sets of 20 reps alternating directions. (10 per side)
Set up seated on your ball, feet hip width distance apart, neutral pelvis with a gentle curve in your low back and ribs down. With the ball held in between both hands extend your arms straight out in front of you at shoulder height. Adding in your core breath here, inhale to expand and then exhale to engage as you squeeze the ball and rotate to one side. Pause here while you inhale to expand and release the squeeze of the ball. Exhale to engage, squeezing the ball again and rotate back to the center. Repeat on the other side.
As mentioned above the challenge with this exercise is the breath and pelvic floor synchronization, along with the added movement of the torso and the squeeze and release of the ball. Just remember, when you hear me say inhale to expand your pelvic floor is blossoming and are staying relaxed. When I say exhale to engage you are contracting the pelvic floor muscles and picking up your blueberry.
87. Split Squat - 1 x 15
Day 16 - Crunchless Core
When I teach the split squat to my clients I have them imagine they are a horse on a merry go round, with a pole running right through their centre. This keeps the alignment from going forward and back. The body can only move up and down. The longer the stance, the easier it is to go up and down. This keeps the front knee tracking over the front ankle instead of moving forward and over the toes.
Core breath added. Complete 1 set of 15 reps per leg.
Set up by standing on your mat with your feet hips width distance, a gentle curve in your low back and your ribs down. Place your hands on your hips and take a long step back with one leg. Front knee will have a slight bend and your rear heel will remain elevated not touching the floor. Find your balance before you begin to move.
Inhale to expand as you bend both knees lowering yourself down. Exhale to engage as you press back up into your start position. Weight should be evenly distributed between the front and back leg.
There are 100's of variations, progressions and modifications that can be done with this exercise. I will list a few below. The most important thing is that you do what feels best for your body....and don't forget the core breath!
---------------------------------------------------------------------------------------------------------------------------
Knee Modification #1: Add a chair on one side of you to help with balance
Knee Modification #2: Less depth in your split squat, keeping yourself in a shorter range of motion with less bend in your knees.
Knee Modification #3: If none of these variations feel good you can start with stepping up onto a step at home and slowly lowering yourself back down. Your foot will remain on top of the step for all 15 reps. This will ensure that you keep proper foot placement as you are moving.
Take note of the same key points. Foot placement on the step and where your knee is in relation to your ankle. (knee stays over the ankle, not in front or behind....this advice will change as you get stronger) Knee will also stay tracking forward, not moving in towards the midline of your body or outside of the line of your hip. Note the core breath with this variation: Inhale to expand as you prepare, exhale to engage as you press yourself up on the step, inhale to engage as you lower yourself back down.
----------------------------------------------------------------------------------------------------------------
Toe Modifications: Two options if you have limited toe mobility. First you can use an elevated surface for your rear foot and place the laces side of your foot facing downward on the elevated surface. This requires zero flexion in the toes or the ball of the foot. This can add a balance challenge so it's recommended at first to have something to hold onto.
The second option will require a shoe on the rear foot. When you step back you will place your rear foot on a wall behind you. Foot will be flat on the wall with tippy toes pointed straight down to the floor. From here you will bend both knees lowering yourself down (inhale on the way down, exhale on the way up)
----------------------------------------------------------------------------------------------------------------------------
Progressions: Turn this into a lunge instead of a split squat. Start with a reverse lunge. If those feel good then you can progress to a forward lunge, and then move into a walking lunge. Staying focused on the core breath as you move can be the most challenging part of this exercise when you are well versed in lunges. The breath may take greater concentration if it's the opposite of what you have been practicing. Inhale on your way down, exhale on your way up.
Point to remember: with all of the progressions listed it's ok to have a slight forward lean of the torso, but it's not necessary. The forward lean will engage your glute a bit more. While keeping your torso straight up and down like a carousel horse will give you greater activation in your quads. Pick what works best for you.
88. Lower Psoas Release - 30 seconds
Day 16 - Crunchless Core
A muscle called the Illiacus is a neighbor of the lower part of the psoas (some people call it the Illiopsoas). This release is meant to create length in the lower part of the muscle that, when tight, can pull the pelvis into a posterior tilt. This is an allowing exercise, not a doing exercise (as are all of the releases).
Prop needed: Small block, towel for your head.
No core breath. Hold at least 30 seconds.
Set yourself up on a flat surface, on your back with your knees bent and your shins close to vertical. For tighter hamstrings or knee limitations you may need to walk your feet slightly further away from your bum.
Slowing lift your hips and slide the block in the lowest position just below your pelvis, close to the top of your sacrum (large flat bone on the lower part of the spine) If you have walked your feet further out to get into the pose walk them closer to your bum again. Your knees will be pointed straight up towards the ceiling and your ankles directly under the knees.
Set your hips back onto the block and let your body settle into place. Allow yourself to relax here. You are not pressing your back down into the floor, you are allowing the muscles to lengthen while supported. You can stay here for several minutes if you like.
89. Lower Psoas Release - 30 seconds
Day 17 - Stand Up
A muscle called the Illiacus is a neighbor of the lower part of the psoas (some people call it the Illiopsoas). This release is meant to create length in the lower part of the muscle that, when tight, can pull the pelvis into a posterior tilt. This is an allowing exercise, not a doing exercise (as are all of the releases).
Prop needed: Small block, towel for your head.
No core breath. Hold at least 30 seconds.
Set yourself up on a flat surface, on your back with your knees bent and your shins close to vertical. For tighter hamstrings or knee limitations you may need to walk your feet slightly further away from your bum.
Slowing lift your hips and slide the block in the lowest position just below your pelvis, close to the top of your sacrum (large flat bone on the lower part of the spine) If you have walked your feet further out to get into the pose walk them closer to your bum again. Your knees will be pointed straight up towards the ceiling and your ankles directly under the knees.
Set your hips back onto the block and let your body settle into place. Allow yourself to relax here. You are not pressing your back down into the floor, you are allowing the muscles to lengthen while supported. You can stay here for several minutes if you like.
90. One Leg Stand - 1 x 12/side
Day 17 - Stand Up
I know, this looks like a bit of a wimpy exercise right? I get it... but when you slow things down and when you add in the core breath it is more challenging than it looks. The focus here is working on the lateral stabilizers in the hips — pretty important for core control.
Complete 1 x 12 reps per side
Start out standing on your mat with your feet parallel to each other and placed pelvis width apart. Ensure your pelvis is in neutral with a gentle curve in your low back and ribs drawn down. Place your hands on your hips. Inhale to expand, exhale to engage as you slowly lift one foot off the floor 2-3 inches. Inhale to expand as you lower that foot back to the floor and then repeat with the opposite side.
This exercise can be modified by standing with your backside close to a wall, so you feel the safety of something behind you to assist with balance. You also have the option of placing a chair to one side of you where you can hold on to it if needed.
Note: Try this with your shoes and socks off. Wearing shoes can negatively impact your ability to balance during this exercise. Going barefoot encourages greater muscle recruitment in the feet, ankles, calves and all the way up the leg.
91. Split Squat - 2 x 10
Day 17 - Stand Up
When I teach the split squat to my clients I have them imagine they are a horse on a merry go round, with a pole running right through their centre. This keeps the alignment from going forward and back. The body can only move up and down. The longer the stance, the easier it is to go up and down. This keeps the front knee tracking over the front ankle instead of moving forward and over the toes.
Core breath added. Complete 2 set of 10 reps per leg.
Set up by standing on your mat with your feet hips width distance, a gentle curve in your low back and your ribs down. Place your hands on your hips and take a long step back with one leg. Front knee will have a slight bend and your rear heel will remain elevated not touching the floor. Find your balance before you begin to move.
Inhale to expand as you bend both knees lowering yourself down. Exhale to engage as you press back up into your start position. Weight should be evenly distributed between the front and back leg.
There are 100's of variations, progressions and modifications that can be done with this exercise. I will list a few below. The most important thing is that you do what feels best for your body....and don't forget the core breath!
---------------------------------------------------------------------------------------------------------------------------
Knee Modification #1: Add a chair on one side of you to help with balance
Knee Modification #2: Less depth in your split squat, keeping yourself in a shorter range of motion with less bend in your knees.
Knee Modification #3: If none of these variations feel good you can start with stepping up onto a step at home and slowly lowering yourself back down. Your foot will remain on top of the step for all 15 reps. This will ensure that you keep proper foot placement as you are moving.
Take note of the same key points. Foot placement on the step and where your knee is in relation to your ankle. (knee stays over the ankle, not in front or behind....this advice will change as you get stronger) Knee will also stay tracking forward, not moving in towards the midline of your body or outside of the line of your hip. Note the core breath with this variation: Inhale to expand as you prepare, exhale to engage as you press yourself up on the step, inhale to engage as you lower yourself back down.
----------------------------------------------------------------------------------------------------------------
Toe Modifications: Two options if you have limited toe mobility. First you can use an elevated surface for your rear foot and place the laces side of your foot facing downward on the elevated surface. This requires zero flexion in the toes or the ball of the foot. This can add a balance challenge so it's recommended at first to have something to hold onto.
The second option will require a shoe on the rear foot. When you step back you will place your rear foot on a wall behind you. Foot will be flat on the wall with tippy toes pointed straight down to the floor. From here you will bend both knees lowering yourself down (inhale on the way down, exhale on the way up)
----------------------------------------------------------------------------------------------------------------------------
Progressions: Turn this into a lunge instead of a split squat. Start with a reverse lunge. If those feel good then you can progress to a forward lunge, and then move into a walking lunge. Staying focused on the core breath as you move can be the most challenging part of this exercise when you are well versed in lunges. The breath may take greater concentration if it's the opposite of what you have been practicing. Inhale on your way down, exhale on your way up.
Point to remember: with all of the progressions listed it's ok to have a slight forward lean of the torso, but it's not necessary. The forward lean will engage your glute a bit more. While keeping your torso straight up and down like a carousel horse will give you greater activation in your quads. Pick what works best for you.
92. Monster Walk - 10 each direction
Day 17 - Stand Up
It's like side stepping and walking in a squat— sounds fun right? Don't worry about adding the core breath here, just go as low as you can, and walk side to side and forward... and then back... and feel the burn!
No Core Breath in this exercise. Complete 10 steps in each direction.
Set up with a band positioned just above both knees. With gentle tension on the band your feet will be slightly wider than pelvis width distance and the toes pointed straight ahead. Hands placed on your hips or in front of you to help counter balance. Squat down as if you're going to sit in an invisible chair, hinge at the hips, send your bum back and make sure your pelvis does not tuck under. From there take a lateral steps, initiating from your hip. Let the follow leg take a step to catch up, but maintain tension on the band.
Once you've completed your lateral steps you can turn and face forward with the same set up, remaining in your squat. Go through your check points to make sure you are still in a good squat position and the pelvis is in neutral. Keeping the feet and knees aligned walk forward 5-8 steps while staying low, followed by taking the same number of steps walking backwards.
This can be modified by not sitting as deeply into the squat posture. Or made more challenging by sending the hips lower in your squat.
93. Hamstring Stretch w/Strap - 30 seconds/side
Day 17 - Stand Up
A common 'cheat' in this exercise is to allow the low black to flatten against the floor which gives the illusion of more 'length' in the hamstrings. Keep the pelvis neutral and only lift the leg as high as you can without the pelvis tipping back. The stretch may not be as strong but you are gaining valuable length that will serve your posture well.
Props needed: Yoga strap or long scarf, small pillow for your head. No core breath. Hold for 30 seconds each side
Start out laying down with the pillow placed under your head for a neutral neck. Extend one leg straight out on to your mat and wrap the strap around the ball of the opposite foot, before eventually straightening that leg.
From here lower the leg about half way to the floor while holding the ends of the strap in your hands. Check in to ensure a your pubic joint and the top of your pelvis are in the same plane.
Maintaining straight knees on both legs, begin slowly pulling the band to bring the leg up. Keep extending through the heel of the elevated leg, looking for length. Once again, check in with your pelvis to make sure you are not gaining length in the elevated leg by accidentally tucking your pelvis and flattening your back against the floor.
Key points: This release is not about how high you can move your leg towards the ceiling, it's about maintaining a neutral pelvis while still finding length in the back of the leg. It may help to imagine you are extending through the heel of the leg in the air and pulling the hip down in the direction of the floor. This allows your body to create length from 2 directions. Additionally, the backside of the leg on the mat needs to stay in contact with the floor. You can place a rolled up towel under the knee if needed for comfort.
94. Belly Release - 60 seconds
Day 18 - Call me Core
No core breath with this exercise. Stay in this position for 60 seconds
Have you ever checked in with your belly and consciously thought about relaxing it? Holding the abs in all day is not serving you— it interferes with digestion and breathing and puts pressure on your pelvic floor. Let it go.
From a kneeling position come onto all fours. Knees will be pelvis width distance and lined up directly under the hips. Hands placed directly under your shoulders with your fingertips spread wide and neck remains long. Check in to confirm the gentle curve in your low back and that your ribs are still in line with the top of the pelvis.
Once you are in position you will empower the belly to gently expand towards the floor. It will remain expanded and relaxed. As you take a breath each time allow for a full expansion. These will be followed by a soft exhalation. No blueberries or pelvic floor engagement. This is to allow the belly to let go of tension, to relax and to release.
If this is challenging for your wrists there are a few things you can do to take some of the pressure off of the joints. First try pressing evenly into each finger tip. This helps to distribute the weight in the hands. Another option is to place a small towel under each palm to minimize the wrist flexion angle. If that doesn't help you can ball your fists and place your knuckles on the ground, being careful to maintain a straight line at the wrist angle.
For those needing an option off of the knees, this can be done standing with your hands placed on the seat of a chair. The most important thing to remember is that you will still need to arrange your posture as close to original exercise as possible. Hands directly under the shoulders but on the chair, feet will be pelvis width distance and lined up directly under the hips. Gentle cure in the low back and the bottom of the ribs in line with the top of the pelvis. From here allow the expansion of the belly as you breath.
95. Supine Isometric Thigh Press - 1 x 15/side
Day 18 - Call me Core
A nice slow, controlled core engagement exercise that gives you the burn you love when working your abs. Isometric means a contraction that is held statically instead of contracting through movement.
Core breath here. Complete 1 set of 15 reps per side
Set yourself up on a flat surface, on your back with your knees bent and your shins close to vertical. For tighter hamstrings or knee limitations you may need to walk your feet slightly further away from your bum. Place a small towel under your head for a neutral neck if needed. Check in to make sure you have a neutral pelvis with your ribs down and gentle curve in your low back.
Inhale to expand, exhale to engage as you press your right hand into your right thigh (right foot is elevated) Inhale to expand as you set the foot back to the floor. Repeat with the left side. (left hand to left knee)
Progression: right hand will press into the left knee and you will alternate from side to side. Core breath will remain the same, inhale to expand, exhale to engage while you press hand to thigh.
96. Seated Ball Squeeze w/Rotation - 2 x 10 (alternate sides)
Day 18 - Call me Core
Working your core and pelvic floor is first about connecting and then about coordinating. This exercise brings in a lot of different elements— control, rotation, balance, arms and chest (and your brain!)... It looks easy but it's challenging, and it works!
Core breath added in to this exercise. Complete 2 sets of 10 reps alternating sides
Set up seated on your ball, feet hip width distance apart, neutral pelvis with a gentle curve in your low back and ribs down. With the ball held in between both hands extend your arms straight out in front of you at shoulder height. Adding in your core breath here, inhale to expand and then exhale to engage as you squeeze the ball and rotate to one side. Pause here while you inhale to expand and release the squeeze of the ball. Exhale to engage, squeezing the ball again and rotate back to the center. Repeat on the other side.
As mentioned above the challenge with this exercise is the breath and pelvic floor synchronization, along with the added movement of the torso and the squeeze and release of the ball. Just remember, when you hear me say inhale to expand your pelvic floor is blossoming and are staying relaxed. When I say exhale to engage you are contracting the pelvic floor muscles and picking up your blueberry.
97. Side Plank - 1 x 10
Day 18 - Call me Core
Working your core and pelvic floor is first about connecting and then about coordinating. This exercise brings in a lot of different elements— control, rotation, balance, arms and chest (and your brain!)... It looks easy but it's challenging, and it works!
Core breath here. Complete 1 set of 10 reps per side
From a side seated position on your mat lower yourself down so that your joints are stacked. Top shoulder lined up directly over the elbow on the floor. Hips, knees and ankles are all stacked on top of the opposite joint. Your knees should be in front of your torso so that your hips are starting in a flexed position. The hand that is furthest from the floor can be placed on the pelvis or you can use it to assist yourself when you press your hips up from the floor.
Inhale to expand, exhale to engage as both hips lift up and forward. This will create a straight line from your shoulders through the hips and down to the knees. Inhale to expand as you lower your hips down and back. Maintain a neutral neck so that you have a strong energy line from the top of your head all the way out through your knees while in the elevated position.
A common complaint with this exercise is how uncomfortable it can be on the shoulder joint. This can be caused by allowing the bottom shoulder to stay relaxed while you are moving up and down, thus causing the shoulder to float up towards the ear. It's important the use all of the muscles in the upper half of your body as well as the lower half in this exercises. For those familiar with the term, it's a press and rebound action. Press the hand, elbow and knees down into the floor so that hips and torso lift up. The shoulder is actively helping to push down.
Modification for this does not change the exercise action. It will change your set up. You can place cushion or bolster safely under your hip. This will bring the floor up slightly so that you are moving through a smaller range of motion for the bottom to the top of the exercise. As you get stronger you can take the extra height assistance away and test to see how much you've improved.
98. Lower Psoas Release - 30-60 seconds
Day 18 - Call me Core
A muscle called the Illiacus is a neighbor of the lower part of the psoas (some people call it the Illiopsoas). This release is meant to create length in the lower part of the muscle that, when tight, can pull the pelvis into a posterior tilt. This is an allowing exercise, not a doing exercise (as are all of the releases).
Prop needed: Small block, towel for your head.
No core breath. Hold 30-60 seconds.
Set yourself up on a flat surface, on your back with your knees bent and your shins close to vertical. For tighter hamstrings or knee limitations you may need to walk your feet slightly further away from your bum.
Slowing lift your hips and slide the block in the lowest position just below your pelvis, close to the top of your sacrum (large flat bone on the lower part of the spine) If you have walked your feet further out to get into the pose walk them closer to your bum again. Your knees will be pointed straight up towards the ceiling and your ankles directly under the knees.
Set your hips back onto the block and let your body settle into place. Allow yourself to relax here. You are not pressing your back down into the floor, you are allowing the muscles to lengthen while supported. You can stay here for several minutes if you like.
99. Thoracic Release - 60 seconds
Day 19 - It's A Bird
Find length and space in your upper back, shoulders and side body so you can breathe better and therefore kegel better!
No core breath added here. Stay in this posture for 60 seconds.
Start by kneeling with the ball in front of you on your mat. Toes can be tucked or top sides of the feet can remain flat on the floor if this is more comfortable. Push the ball away to allow a lengthening in your arms and side body. Arms should remain straight. If you feel a shoulder impingement or discomfort spread the arms a bit wider on the ball.
Let your hips sink back on to your heels and check in with your ribs to confirm they have not become thrust forward, causing an overarching of the low back. Take a few moments here and allow your body to bring in more length with each breath.
You can make this release more dynamic by slowly rotating the torso on the ball from side to side, attempting to gain more length in your side body. Another option is to lift your bum off of your heels and move your arms forward and back on the ball rather than side to side.
100. Standing Bird Dog - 1 x 10/side
Day 19 - It's A Bird
You've most likely done the floor version of this exercise where you start out on hands and knees and then lift opposite arm and leg. Same thing here but you are standing. This of course adds a different challenge with balance. Have fun with it!
Core breath added. Complete 1 set of 10 reps per side (20 total)
Start out standing on your mat with your feet pelvis width apart and toes pointed straight ahead. Check in to confirm neutral pelvis, a small curve in your low back and your ribs down.
Inhale to expand, exhale to engage as you reach with your left arm and your right leg away from the body, extending the limbs long and hinging forward at the hip joint. Inhale to expand as you return torso, arm and leg to the start point. Repeat with the opposite side.
Points to remember: Your torso and the moving leg act as a teeter-totter with the hip joint acting as the fulcrum. When your trunk begins to move forward your leg will extend back, moving as one unit rather than moving in segments.
Modification: Stand close to a wall so that you feel a sense of safety with your balance, without needing to add a chair.
101. Split Squat - 2 x 12/side
Day 19 - It's A Bird
When I teach the split squat to my clients I have them imagine they are a horse on a merry go round, with a pole running right through their centre. This keeps the alignment from going forward and back. The body can only move up and down. The longer the stance, the easier it is to go up and down. This keeps the front knee tracking over the front ankle instead of moving forward and over the toes.
Core breath added. Complete 2 set of 12 reps per leg.
Set up by standing on your mat with your feet hips width distance, a gentle curve in your low back and your ribs down. Place your hands on your hips and take a long step back with one leg. Front knee will have a slight bend and your rear heel will remain elevated not touching the floor. Find your balance before you begin to move.
Inhale to expand as you bend both knees lowering yourself down. Exhale to engage as you press back up into your start position. Weight should be evenly distributed between the front and back leg.
There are 100's of variations, progressions and modifications that can be done with this exercise. I will list a few below. The most important thing is that you do what feels best for your body....and don't forget the core breath!
---------------------------------------------------------------------------------------------------------------------------
Knee Modification #1: Add a chair on one side of you to help with balance
Knee Modification #2: Less depth in your split squat, keeping yourself in a shorter range of motion with less bend in your knees.
Knee Modification #3: If none of these variations feel good you can start with stepping up onto a step at home and slowly lowering yourself back down. Your foot will remain on top of the step for all 15 reps. This will ensure that you keep proper foot placement as you are moving.
Take note of the same key points. Foot placement on the step and where your knee is in relation to your ankle. (knee stays over the ankle, not in front or behind....this advice will change as you get stronger) Knee will also stay tracking forward, not moving in towards the midline of your body or outside of the line of your hip. Note the core breath with this variation: Inhale to expand as you prepare, exhale to engage as you press yourself up on the step, inhale to engage as you lower yourself back down.
----------------------------------------------------------------------------------------------------------------
Toe Modifications: Two options if you have limited toe mobility. First you can use an elevated surface for your rear foot and place the laces side of your foot facing downward on the elevated surface. This requires zero flexion in the toes or the ball of the foot. This can add a balance challenge so it's recommended at first to have something to hold onto.
The second option will require a shoe on the rear foot. When you step back you will place your rear foot on a wall behind you. Foot will be flat on the wall with tippy toes pointed straight down to the floor. From here you will bend both knees lowering yourself down (inhale on the way down, exhale on the way up)
----------------------------------------------------------------------------------------------------------------------------
Progressions: Turn this into a lunge instead of a split squat. Start with a reverse lunge. If those feel good then you can progress to a forward lunge, and then move into a walking lunge. Staying focused on the core breath as you move can be the most challenging part of this exercise when you are well versed in lunges. The breath may take greater concentration if it's the opposite of what you have been practicing. Inhale on your way down, exhale on your way up.
Point to remember: with all of the progressions listed it's ok to have a slight forward lean of the torso, but it's not necessary. The forward lean will engage your glute a bit more. While keeping your torso straight up and down like a carousel horse will give you greater activation in your quads. Pick what works best for you.
102. Monster Walk - 10 each direction
Day 19 - It's A Bird
It's like side stepping and walking in a squat— sounds fun right? Don't worry about adding the core breath here, just go as low as you can, and walk side to side and forward... and then back... and feel the burn!
No Core Breath in this exercise. Complete 10 steps in each direction.
Set up with a band positioned just above both knees. With gentle tension on the band your feet will be slightly wider than pelvis width distance and the toes pointed straight ahead. Hands placed on your hips or in front of you to help counter balance. Squat down as if you're going to sit in an invisible chair, hinge at the hips, send your bum back and make sure your pelvis does not tuck under. From there take a lateral steps, initiating from your hip. Let the follow leg take a step to catch up, but maintain tension on the band.
Once you've completed your lateral steps you can turn and face forward with the same set up, remaining in your squat. Go through your check points to make sure you are still in a good squat position and the pelvis is in neutral. Keeping the feet and knees aligned walk forward 5-8 steps while staying low, followed by taking the same number of steps walking backwards.
This can be modified by not sitting as deeply into the squat posture. Or made more challenging by sending the hips lower in your squat.
103. Stacked Butterfly - 30 seconds/side
Day 19 - It's A Bird
Oh those hips! How they love this pose! (Inner thighs too!)
No core breath. 30 seconds each side. Prop needed: Yoga block, small pillow or a rolled up towel. (just one of these options is necessary)
Lying on your back with your head and neck in neutral, allow your right knee to fall out to the side maintaining a flexed ankle.
Now place your left ankle, also flexed, in the nook that separates the top of your right calf and your right knee. From here allow the top knee to gently open towards the floor. Here is where you will place your prop under the left hip for some extra support. Reminder that this should feel relaxing and you are seeking a gentle stretch.
If stacking the foot in the nook feels like too much of a stretch to begin you can work your way into this pose. Your setup will be the same, but you can place the top foot on top of the bottom ankle and then work your way up the leg from there. As your hips begin to open and you settle into the pose you can adjust your foot placement by moving it closer to the knee.
Key point to remember: maintain ankle flexion on both sides. Ankle flexion= top of foot pulled towards the knees.
104. Posterior Pelvic Floor Release - 30 seconds/side
Day 20 - One Two One
Release tension in your glutes and hear your pelvic floor sigh.
Stay in this posture for 60 seconds. No core breath with this release.
You will need a hard surface so the ball does not sink into the chair.
Place the ball between your sitz bone and your anus.
Maintain relaxed breathing as you let yourself sink further into the ball with each breath. You are looking to create space and let go of any tension you may be holding.
105. One Leg Bridge - 2 x 10/side
Day 20 - One Two One
Remember the bridge? Well now you are going to do it with 1 leg lifted. The key here is to keep the pelvis neutral and don't let one side drop as you lift one foot off of the ground. There are a few variations so you can try them out and see what your body likes best.
Core breath added. Complete 2 sets of 10 reps per side.
Set yourself up on a flat surface, on your back with your knees bent and your shins close to vertical. For tighter hamstrings or knee limitations you may need to walk your feet slightly further away from your bum.
Option #1: Extend one leg up towards the ceiling and do repeats of the hip up and down motion staying on that same side for 10 repetitions. Your core breath will be as follows: Inhale to expand, exhale to engage as you lift the leg up towards the ceiling. Inhale to expand, exhale to engage as you bring your hips up, inhale to expand on your way down.
Option #2: Start with both feet planted, move into your bridge and then extend 1 leg out and back before you return your hips to the mat. Your core breath will be as follows: Inhale to expand, exhale to engage as you lift your hips evenly up toward the ceiling and extend the leg out. Inhale to expand as you bring the leg in and lower yourself back down.
Key points: knee of the foot planted will stay pointed straight and aligned with your hip bones-do not let it move inward and outward, press the back of your palms, arms and shoulders into the floor. This helps keep your chest open.
106. Hip Raise w/Ball - 1 x 15
Day 20 - One Two One
Complete 1 set of 15 reps
Core control starts with the pelvic floor. This move fires up the backs of the legs and challenges your balance.
Set yourself up with the ball placed under your feet and calves. Adding in your core breath, you will inhale to expand, exhale to engage lifting your pelvic floor as you raise your hips up towards the ceiling. Inhale to expand as you lower yourself back down to your start position. This counts as 1 repetition.
I've added in a few progressions below if you feel like you want to more of a challenge. Pick the one that works best for your body and the level you are at today.
------------------------------------------------------------------------------------------------------------------------------
Progression #1: You will bend your knees while the hips are elevated, curling the ball towards your bum. Then lower your hips back to the floor and extend the legs to return to your start position. This is 1 repetition. Repeat 2x15
Your breathing pattern will be as follows: Inhale to prepare, exhale to engage lifting the hips. Inhale-expand as you pause. Exhale to engage, curling the ball towards your bum. Inhale to expand and lower yourself back to the floor. Reset for your next repetition.
------------------------------------------------------------------------------------------------------------------------------
Progression #2 : Hips will remain elevated as you curl the ball towards your bum, followed by extending and straightening the legs. This is 1 repetition. Repeat 2x15
Breathing pattern will be as follows: Inhale to prepare. Exhale and engage as you lift your hips up. Inhale and expand with your pause. Exhale-engage curling the ball towards your bum. Inhale and expand maintaining elevated hips. Exhale and engage extending the legs back out away from the hips.
------------------------------------------------------------------------------------------------------------------------------
Progression #3: Now we will bring it all together. This option will follow the same movement instructions as #2, but we will be moving through the exercise quicker. This encourages an added core breath challenge. Repeat 2x15
Inhale and expand to prepare. Exhale to engage as you lift the hips up and curl the ball towards your bum. Inhale and expand as you expand the legs back out away from your body. This complete move is 1 repetition. Remember to keep those hips up!
107. Side Plank - 1 x 15/side
Day 20 - One Two One
A little different than how you may have been doing a side bridge... or maybe this is a new exercise for you. It is a great way to work the inner core in a non traditional way while also targeting the outer hips. The upper body is brought in to so really, it is kinda like a full body exercise :-)
Core breath here. Complete 1 set of 15 reps per side
From a side seated position on your mat lower yourself down so that your joints are stacked. Top shoulder lined up directly over the elbow on the floor. Hips, knees and ankles are all stacked on top of the opposite joint. Your knees should be in front of your torso so that your hips are starting in a flexed position. The hand that is furthest from the floor can be placed on the pelvis or you can use it to assist yourself when you press your hips up from the floor.
Inhale to expand, exhale to engage as both hips lift up and forward. This will create a straight line from your shoulders through the hips and down to the knees. Inhale to expand as you lower your hips down and back. Maintain a neutral neck so that you have a strong energy line from the top of your head all the way out through your knees while in the elevated position.
A common complaint with this exercise is how uncomfortable it can be on the shoulder joint. This can be caused by allowing the bottom shoulder to stay relaxed while you are moving up and down, thus causing the shoulder to float up towards the ear. It's important the use all of the muscles in the upper half of your body as well as the lower half in this exercises. For those familiar with the term, it's a press and rebound action. Press the hand, elbow and knees down into the floor so that hips and torso lift up. The shoulder is actively helping to push down.
Modification for this does not change the exercise action. It will change your set up. You can place cushion or bolster safely under your hip. This will bring the floor up slightly so that you are moving through a smaller range of motion for the bottom to the top of the exercise. As you get stronger you can take the extra height assistance away and test to see how much you've improved.
108. Psoas Release - 5 mins
Day 20 - One Two One
A tight psoas can tuck the pelvis under, it can thrust the ribs forward and pulls the low back into an exaggerated curve. All of this can interfere with optimal core and pelvic floor function so taking time to really let the psoas find length and suppleness is a good thing. For those with an already exaggerated curve in your low back this is a great pose to add into your routine.
Props needed: Bolster or a blanket folded into a rectangle shape thick enough to create space between your ribs and the floor when you lay dow. Additionally a small pillow or towel for your head if needed.
No core breath. Stay here 5 minutes
Set up: Lower yourself down so that the bottom edge of the elevated surface is between your shoulder blades and just above your bra strap. Laying on your back, extend your legs straight out. It's ok to let your feet and legs relax and roll out to the sides. Here you can add the pillow under your head to help maintain a neutral neck position.
As you are settling into the release check in with your pelvis and make sure your pubic joint is in the same plane as your 2 hip bones. You can do this by placing your hands on the front of your pelvis and your fingertips at pubic joint. From here take your hands and feel the space between your back ribs and the floor. You want to have space to allow the ribs to sink down towards your mat. Take note, as this is your starting point. Extend your arms out to the sides and relax in this space. Periodically checking under your torso to feel if the space between you and the floor is decreasing as your ribs start to sink.
To exit the pose roll to one side and press yourself up to seated position with your hands.
109. Lower Psoas Release - 30-60 seconds
Day 21 - Lower Body Burn
A muscle called the Illiacus is a neighbor of the lower part of the psoas (some people call it the Illiopsoas). This release is meant to create length in the lower part of the muscle that, when tight, can pull the pelvis into a posterior tilt. This is an allowing exercise, not a doing exercise (as are all of the releases).
Prop needed: Small block, towel for your head.
No core breath. Hold 30-60 seconds.
Set yourself up on a flat surface, on your back with your knees bent and your shins close to vertical. For tighter hamstrings or knee limitations you may need to walk your feet slightly further away from your bum.
Slowing lift your hips and slide the block in the lowest position just below your pelvis, close to the top of your sacrum (large flat bone on the lower part of the spine) If you have walked your feet further out to get into the pose walk them closer to your bum again. Your knees will be pointed straight up towards the ceiling and your ankles directly under the knees.
Set your hips back onto the block and let your body settle into place. Allow yourself to relax here. You are not pressing your back down into the floor, you are allowing the muscles to lengthen while supported. You can stay here for several minutes if you like.
110. Standing Bird Dog - 2 x 12/side
Day 21 - Lower Body Burn
You've most likely done the floor version of this exercise where you start out on hands and knees and then lift opposite arm and leg. Same thing here but you are standing. This of course adds a different challenge with balance. Have fun with it!
Core breath added. Complete 2 sets of 12 reps per side (24 total)
Start out standing on your mat with your feet pelvis width apart and toes pointed straight ahead. Check in to confirm neutral pelvis, a small curve in your low back and your ribs down.
Inhale to expand, exhale to engage as you reach with your left arm and your right leg away from the body, extending the limbs long and hinging forward at the hip joint. Inhale to expand as you return torso, arm and leg to the start point. Repeat with the opposite side.
Points to remember: Your torso and the moving leg act as a teeter-totter with the hip joint acting as the fulcrum. When your trunk begins to move forward your leg will extend back, moving as one unit rather than moving in segments.
Modification: Stand close to a wall so that you feel a sense of safety with your balance, without needing to add a chair.
111. Split Squat - 2 x 12/side
Day 21 - Lower Body Burn
When I teach the split squat to my clients I have them imagine they are a horse on a merry go round, with a pole running right through their centre. This keeps the alignment from going forward and back. The body can only move up and down. The longer the stance, the easier it is to go up and down. This keeps the front knee tracking over the front ankle instead of moving forward and over the toes.
Core breath added. Complete 2 set of 12 reps per leg.
Set up by standing on your mat with your feet hips width distance, a gentle curve in your low back and your ribs down. Place your hands on your hips and take a long step back with one leg. Front knee will have a slight bend and your rear heel will remain elevated not touching the floor. Find your balance before you begin to move.
Inhale to expand as you bend both knees lowering yourself down. Exhale to engage as you press back up into your start position. Weight should be evenly distributed between the front and back leg.
There are 100's of variations, progressions and modifications that can be done with this exercise. I will list a few below. The most important thing is that you do what feels best for your body....and don't forget the core breath!
---------------------------------------------------------------------------------------------------------------------------
Knee Modification #1: Add a chair on one side of you to help with balance
Knee Modification #2: Less depth in your split squat, keeping yourself in a shorter range of motion with less bend in your knees.
Knee Modification #3: If none of these variations feel good you can start with stepping up onto a step at home and slowly lowering yourself back down. Your foot will remain on top of the step for all 15 reps. This will ensure that you keep proper foot placement as you are moving.
Take note of the same key points. Foot placement on the step and where your knee is in relation to your ankle. (knee stays over the ankle, not in front or behind....this advice will change as you get stronger) Knee will also stay tracking forward, not moving in towards the midline of your body or outside of the line of your hip. Note the core breath with this variation: Inhale to expand as you prepare, exhale to engage as you press yourself up on the step, inhale to engage as you lower yourself back down.
----------------------------------------------------------------------------------------------------------------
Toe Modifications: Two options if you have limited toe mobility. First you can use an elevated surface for your rear foot and place the laces side of your foot facing downward on the elevated surface. This requires zero flexion in the toes or the ball of the foot. This can add a balance challenge so it's recommended at first to have something to hold onto.
The second option will require a shoe on the rear foot. When you step back you will place your rear foot on a wall behind you. Foot will be flat on the wall with tippy toes pointed straight down to the floor. From here you will bend both knees lowering yourself down (inhale on the way down, exhale on the way up)
----------------------------------------------------------------------------------------------------------------------------
Progressions: Turn this into a lunge instead of a split squat. Start with a reverse lunge. If those feel good then you can progress to a forward lunge, and then move into a walking lunge. Staying focused on the core breath as you move can be the most challenging part of this exercise when you are well versed in lunges. The breath may take greater concentration if it's the opposite of what you have been practicing. Inhale on your way down, exhale on your way up.
Point to remember: with all of the progressions listed it's ok to have a slight forward lean of the torso, but it's not necessary. The forward lean will engage your glute a bit more. While keeping your torso straight up and down like a carousel horse will give you greater activation in your quads. Pick what works best for you.
112. Frankenstein Walk - 1 x 15 each direction
Day 21 - Lower Body Burn
The trick here is to keep your legs straight and land on the outside edges of your foot with your foot flat. The tendency will be to land on your toe first and then put your heel down... try to land on the entire foot at once. Slow, controlled side stepping movements. Make sure you go both ways.
No Core Breath in this exercise.
Complete 1 set of 15 reps in each direction
113. Supine Butterfly - 60 seconds
Day 21 - Lower Body Burn
Your inner thighs influence the pelvic floor. Take time to lengthen them so they can better help your core.
No core breath with this release.
Stay in this posture for 60 seconds. The main goal here is to be able to relax into this release. If you are feeling a deep stretch but it is causing tension in other parts of the body add a prop to modify.
Modification for this release can be done by placing pillows, yoga bolsters or blocks, rolled up towels or anything creative that you have at home under each leg. When placing a prop closer to the hip you will feel more support. As you move the support closer to the knees you will experience a greater level of stretch.
114. BONUS - The Knack
Day 21 - Lower Body Burn
115. Stacked Butterfly - 30 seconds/side
Day 22 - Up Up And Away
Oh those hips! How they love this pose! (Inner thighs too!)
No core breath. 30 seconds each side. Prop needed: Yoga block, small pillow or a rolled up towel. (just one of these options is necessary)
Lying on your back with your head and neck in neutral, allow your right knee to fall out to the side maintaining a flexed ankle.
Now place your left ankle, also flexed, in the nook that separates the top of your right calf and your right knee. From here allow the top knee to gently open towards the floor. Here is where you will place your prop under the left hip for some extra support. Reminder that this should feel relaxing and you are seeking a gentle stretch.
If stacking the foot in the nook feels like too much of a stretch to begin you can work your way into this pose. Your setup will be the same, but you can place the top foot on top of the bottom ankle and then work your way up the leg from there. As your hips begin to open and you settle into the pose you can adjust your foot placement by moving it closer to the knee.
Key point to remember: maintain ankle flexion on both sides. Ankle flexion= top of foot pulled towards the knees.
116. Push Ups w/Ball - 2 x 12
Day 22 - Up Up And Away
A great exercise for those that want some good upper body but don't like being on their knees or find the straight leg ones a bit too much. This is a great option for women with prolapse or those who find push ups bring on symptoms like leaking.
Core breath here. Complete 2 sets of 12 reps
Starting on your mat with the stability ball in font of you touching your thighs. Gently lower yourself down so that your pelvis and abdomen are on the ball. Place your hands on the ground and slowly walk yourself forward until your feet are off the ground and you are balancing on the ball with your legs extended back.
Wrists are slightly wider than shoulder width distance. Keep your pelvis in neutral and have a strong energy line from the crown of your head through the tips of the toes. This keeps your body in a strong posture.
Inhale to expand as you lower yourself down. Exhale to engage as you press yourself back up.
Points to remember with a pushup: keep your elbows pointed slightly back. Anywhere from a 60-45 degree angle will protect your shoulders.
This exercise can be altered by changing your body's position on the ball. For a modification walk your hands back closer to the ball to create a shorter level. Or you can walk your hands further away from the ball to create more of a challenge.
117. Ball Roll Out - 1 x 10
Day 22 - Up Up And Away
Crunches only recruit about 20% of your rectus (6-pack muscles), whereas ball roll outs get close to 100%! You get way more bang for your buck here and you get some shoulder and lat action too! This exercise requires a good deal of spinal stability so it's important that you start with a modified variation and work up to where your own personal challenge is. The firmer the ball the more stability you will have.
Core breath here. Complete 1 set of 10 reps. You may need an extra cushion under your knees for comfort.
Start on your knees with your toes tucked under. This provides additional leverage as you begin to move. (If this is uncomfortable for your toes walk yourself back to a wall and place your feet flat against the wall for stability) Next you will place your forearms on the ball with your palms facing one another. Hips are back and hovering over your calves. Check in to confirm a neutral pelvis and ribs are down.
Inhale to expand as you move the ball away from you, gliding your forearms along the top of the surface. Exhale to engage as you press the forearms down and move your hips back to your starting point.
Modifications: There are a few options that can make this feel more accessible. You can start by practicing this exercises as an isometric hold. Meaning you're not rolling forward and backwards. Essentially you are doing an elbow and knee plank while balancing on the ball. You will add your core breath as an inhale to expand and exhale to engage once you are set in your held position. This will start as a 10 second hold and you can build from there.
Once you feel that you have mastered your hold you can up the challenge by doing very small ball roll aways, giving yourself time in between each one to reset your body. Just remember to inhale on the way out and exhale on the way back.
Progression: Place your hands on the ball rather than the forearms. This allows a greater range of motion. The further you press the ball away from the body the harder this will be.
I cannot over emphasize that this move is all about stabilizing your spine. If you feel yourself start to sag or break form take the intensity down by shortening your movement range.
118. Side Plank - 2 x 10/side
Day 22 - Up Up And Away
A little different than how you may have been doing a side bridge... or maybe this is a new exercise for you. It is a great way to work the inner core in a non traditional way while also targeting the outer hips. The upper body is brought in to so really, it is kinda like a full body exercise :-)
Core breath here. Complete 2 sets of 10 reps per side
From a side seated position on your mat lower yourself down so that your joints are stacked. Top shoulder lined up directly over the elbow on the floor. Hips, knees and ankles are all stacked on top of the opposite joint. Your knees should be in front of your torso so that your hips are starting in a flexed position. The hand that is furthest from the floor can be placed on the pelvis or you can use it to assist yourself when you press your hips up from the floor.
Inhale to expand, exhale to engage as both hips lift up and forward. This will create a straight line from your shoulders through the hips and down to the knees. Inhale to expand as you lower your hips down and back. Maintain a neutral neck so that you have a strong energy line from the top of your head all the way out through your knees while in the elevated position.
A common complaint with this exercise is how uncomfortable it can be on the shoulder joint. This can be caused by allowing the bottom shoulder to stay relaxed while you are moving up and down, thus causing the shoulder to float up towards the ear. It's important the use all of the muscles in the upper half of your body as well as the lower half in this exercises. For those familiar with the term, it's a press and rebound action. Press the hand, elbow and knees down into the floor so that hips and torso lift up. The shoulder is actively helping to push down.
Modification for this does not change the exercise action. It will change your set up. You can place cushion or bolster safely under your hip. This will bring the floor up slightly so that you are moving through a smaller range of motion for the bottom to the top of the exercise. As you get stronger you can take the extra height assistance away and test to see how much you've improved.
119. Thoracic Release - 60 seconds
Day 22 - Up Up And Away
Find length and space in your upper back, shoulders and side body so you can breathe better and therefore kegel better!
No core breath added here. Stay in this posture for 60 seconds.
Start by kneeling with the ball in front of you on your mat. Toes can be tucked or top sides of the feet can remain flat on the floor if this is more comfortable. Push the ball away to allow a lengthening in your arms and side body. Arms should remain straight. If you feel a shoulder impingement or discomfort spread the arms a bit wider on the ball.
Let your hips sink back on to your heels and check in with your ribs to confirm they have not become thrust forward, causing an overarching of the low back. Take a few moments here and allow your body to bring in more length with each breath.
You can make this release more dynamic by slowly rotating the torso on the ball from side to side, attempting to gain more length in your side body. Another option is to lift your bum off of your heels and move your arms forward and back on the ball rather than side to side.
120. Belly Release - 60 seconds
Day 23 - Hello Booty
No core breath with this exercise. Stay in this position for 60 seconds
Have you ever checked in with your belly and consciously thought about relaxing it? Holding the abs in all day is not serving you— it interferes with digestion and breathing and puts pressure on your pelvic floor. Let it go.
From a kneeling position come onto all fours. Knees will be pelvis width distance and lined up directly under the hips. Hands placed directly under your shoulders with your fingertips spread wide and neck remains long. Check in to confirm the gentle curve in your low back and that your ribs are still in line with the top of the pelvis.
Once you are in position you will empower the belly to gently expand towards the floor. It will remain expanded and relaxed. As you take a breath each time allow for a full expansion. These will be followed by a soft exhalation. No blueberries or pelvic floor engagement. This is to allow the belly to let go of tension, to relax and to release.
If this is challenging for your wrists there are a few things you can do to take some of the pressure off of the joints. First try pressing evenly into each finger tip. This helps to distribute the weight in the hands. Another option is to place a small towel under each palm to minimize the wrist flexion angle. If that doesn't help you can ball your fists and place your knuckles on the ground, being careful to maintain a straight line at the wrist angle.
For those needing an option off of the knees, this can be done standing with your hands placed on the seat of a chair. The most important thing to remember is that you will still need to arrange your posture as close to original exercise as possible. Hands directly under the shoulders but on the chair, feet will be pelvis width distance and lined up directly under the hips. Gentle cure in the low back and the bottom of the ribs in line with the top of the pelvis. From here allow the expansion of the belly as you breath.
121. Standing Bird Dog - 2 x 15/side
Day 23 - Hello Booty
You've most likely done the floor version of this exercise where you start out on hands and knees and then lift opposite arm and leg. Same thing here but you are standing. This of course adds a different challenge with balance. Have fun with it!
Core breath added. Complete 2 sets of 15 reps per side (30 total)
Start out standing on your mat with your feet pelvis width apart and toes pointed straight ahead. Check in to confirm neutral pelvis, a small curve in your low back and your ribs down.
Inhale to expand, exhale to engage as you reach with your left arm and your right leg away from the body, extending the limbs long and hinging forward at the hip joint. Inhale to expand as you return torso, arm and leg to the start point. Repeat with the opposite side.
Points to remember: Your torso and the moving leg act as a teeter-totter with the hip joint acting as the fulcrum. When your trunk begins to move forward your leg will extend back, moving as one unit rather than moving in segments.
Modification: Stand close to a wall so that you feel a sense of safety with your balance, without needing to add a chair.
122. Split Squat - 2 x 15/side
Day 23 - Hello Booty
When I teach the split squat to my clients I have them imagine they are a horse on a merry go round, with a pole running right through their centre. This keeps the alignment from going forward and back. The body can only move up and down. The longer the stance, the easier it is to go up and down. This keeps the front knee tracking over the front ankle instead of moving forward and over the toes.
Core breath added. Complete 2 sets of 15 reps per leg.
Set up by standing on your mat with your feet hips width distance, a gentle curve in your low back and your ribs down. Place your hands on your hips and take a long step back with one leg. Front knee will have a slight bend and your rear heel will remain elevated not touching the floor. Find your balance before you begin to move.
Inhale to expand as you bend both knees lowering yourself down. Exhale to engage as you press back up into your start position. Weight should be evenly distributed between the front and back leg.
There are 100's of variations, progressions and modifications that can be done with this exercise. I will list a few below. The most important thing is that you do what feels best for your body....and don't forget the core breath!
---------------------------------------------------------------------------------------------------------------------------
Knee Modification #1: Add a chair on one side of you to help with balance
Knee Modification #2: Less depth in your split squat, keeping yourself in a shorter range of motion with less bend in your knees.
Knee Modification #3: If none of these variations feel good you can start with stepping up onto a step at home and slowly lowering yourself back down. Your foot will remain on top of the step for all 15 reps. This will ensure that you keep proper foot placement as you are moving.
Take note of the same key points. Foot placement on the step and where your knee is in relation to your ankle. (knee stays over the ankle, not in front or behind....this advice will change as you get stronger) Knee will also stay tracking forward, not moving in towards the midline of your body or outside of the line of your hip. Note the core breath with this variation: Inhale to expand as you prepare, exhale to engage as you press yourself up on the step, inhale to engage as you lower yourself back down.
----------------------------------------------------------------------------------------------------------------
Toe Modifications: Two options if you have limited toe mobility. First you can use an elevated surface for your rear foot and place the laces side of your foot facing downward on the elevated surface. This requires zero flexion in the toes or the ball of the foot. This can add a balance challenge so it's recommended at first to have something to hold onto.
The second option will require a shoe on the rear foot. When you step back you will place your rear foot on a wall behind you. Foot will be flat on the wall with tippy toes pointed straight down to the floor. From here you will bend both knees lowering yourself down (inhale on the way down, exhale on the way up)
----------------------------------------------------------------------------------------------------------------------------
Progressions: Turn this into a lunge instead of a split squat. Start with a reverse lunge. If those feel good then you can progress to a forward lunge, and then move into a walking lunge. Staying focused on the core breath as you move can be the most challenging part of this exercise when you are well versed in lunges. The breath may take greater concentration if it's the opposite of what you have been practicing. Inhale on your way down, exhale on your way up.
Point to remember: with all of the progressions listed it's ok to have a slight forward lean of the torso, but it's not necessary. The forward lean will engage your glute a bit more. While keeping your torso straight up and down like a carousel horse will give you greater activation in your quads. Pick what works best for you.
123. Hip Extension - 2 x 10/side
Day 23 - Hello Booty
An exercise that challenges your balance, core control, hips, glutes— heck it does a lot! Be careful not to hinge forward— initiate and focus the movement on the glute of the extending leg. Your standing leg should also feel that it is working to stabilize your body. You're welcome!
Props: Thera-band and a chair. Core breath added. Complete 2 sets of 10 reps per side (20 reps total)
Place your chair on your mat and stand behind it with the resistance band around your ankles. Feet will be hip width distance apart, toes pointed straight ahead, neutral pelvis with a gentle curve in your low back and ribs down.
With your hands on the back of your chair inhale to expand, exhale to engage as you extend one leg back behind you, maintaining a straight knee and only extending from the hip. Inhale to engage as bring your foot back to the mat. Repeat for 10 before you switch legs.
Key points: it's common with this exercise to overarch the low back as you begin to move the leg. Keep in mind that less is more with this movement. You will feel more glute activation when you extend the leg back only a small amount. This is another exercise that requires a substantial amount of trunk stability. It's also worth noting to not lock the knee joint on the leg that remains in contact with the floor.
Variations: Option to alter the angle in which you extend the leg back if you want to target different areas of your glute. This is not a requirement but it can be fun to play with!
124. Hamstring Stretch w/Strap - 30 seconds/side
Day 23 - Hello Booty
A common 'cheat' in this exercise is to allow the low black to flatten against the floor which gives the illusion of more 'length' in the hamstrings. Keep the pelvis neutral and only lift the leg as high as you can without the pelvis tipping back. The stretch may not be as strong but you are gaining valuable length that will serve your posture well.
Props needed: Yoga strap or long scarf, small pillow for your head. No core breath. Hold for 30 seconds each side
Start out laying down with the pillow placed under your head for a neutral neck. Extend one leg straight out on to your mat and wrap the strap around the ball of the opposite foot, before eventually straightening that leg.
From here lower the leg about half way to the floor while holding the ends of the strap in your hands. Check in to ensure a your pubic joint and the top of your pelvis are in the same plane.
Maintaining straight knees on both legs, begin slowly pulling the band to bring the leg up. Keep extending through the heel of the elevated leg, looking for length. Once again, check in with your pelvis to make sure you are not gaining length in the elevated leg by accidentally tucking your pelvis and flattening your back against the floor.
Key points: This release is not about how high you can move your leg towards the ceiling, it's about maintaining a neutral pelvis while still finding length in the back of the leg. It may help to imagine you are extending through the heel of the leg in the air and pulling the hip down in the direction of the floor. This allows your body to create length from 2 directions. Additionally, the backside of the leg on the mat needs to stay in contact with the floor. You can place a rolled up towel under the knee if needed for comfort.
125. Belly Release - 60 seconds
Day 24 - Work It!
We're on the home stretch everyone! Keep it up! When you're done with today's session, come say hi in the chat and let us know how you're doing!
No core breath with this exercise. Stay in this position for 60 seconds
Have you ever checked in with your belly and consciously thought about relaxing it? Holding the abs in all day is not serving you— it interferes with digestion and breathing and puts pressure on your pelvic floor. Let it go.
From a kneeling position come onto all fours. Knees will be pelvis width distance and lined up directly under the hips. Hands placed directly under your shoulders with your fingertips spread wide and neck remains long. Check in to confirm the gentle curve in your low back and that your ribs are still in line with the top of the pelvis.
Once you are in position you will empower the belly to gently expand towards the floor. It will remain expanded and relaxed. As you take a breath each time allow for a full expansion. These will be followed by a soft exhalation. No blueberries or pelvic floor engagement. This is to allow the belly to let go of tension, to relax and to release.
If this is challenging for your wrists there are a few things you can do to take some of the pressure off of the joints. First try pressing evenly into each finger tip. This helps to distribute the weight in the hands. Another option is to place a small towel under each palm to minimize the wrist flexion angle. If that doesn't help you can ball your fists and place your knuckles on the ground, being careful to maintain a straight line at the wrist angle.
For those needing an option off of the knees, this can be done standing with your hands placed on the seat of a chair. The most important thing to remember is that you will still need to arrange your posture as close to original exercise as possible. Hands directly under the shoulders but on the chair, feet will be pelvis width distance and lined up directly under the hips. Gentle cure in the low back and the bottom of the ribs in line with the top of the pelvis. From here allow the expansion of the belly as you breath.
126. Hip Raise w/Ball - 3 x 10
Day 24 - Work It!
Core control starts with the pelvic floor. This move fires up the backs of the legs and challenges your balance.
Set yourself up with the ball placed under your feet and calves. Adding in your core breath, you will inhale to expand, then exhale to engage your pelvic floor then raise your hips up towards the ceiling. Inhale to expand as you lower yourself back down to your start position. This counts as 1 repetition.
I've added in a few progressions below if you feel like you want to more of a challenge. Pick the one that works best for your body and the level you are at today.
Core breath added. 3 sets of 10 reps.
------------------------------------------------------------------------------------------------------------------------------
Progression #1: You will bend your knees while the hips are elevated, curling the ball towards your bum. Then lower your hips back to the floor and extend the legs to return to your start position. This is 1 repetition. Repeat x10.
Your breathing pattern will be as follows: Inhale to prepare, exhale to engage lifting the hips. Inhale-expand as you pause. Exhale to engage, curling the ball towards your bum. Inhale to expand and lower yourself back to the floor. Reset for your next repetition.
------------------------------------------------------------------------------------------------------------------------------
Progression #2 : Hips will remain elevated as you curl the ball towards your bum, followed by extending and straightening the legs. This is 1 repetition. Repeat x10
Breathing pattern will be as follows: Inhale to prepare. Exhale and engage as you lift your hips up. Inhale and expand with your pause. Exhale-engage curling the ball towards your bum. Inhale and expand maintaining elevated hips. Exhale and engage extending the legs back out away from the hips.
------------------------------------------------------------------------------------------------------------------------------
Progression #3: Now we will bring it all together. This option will follow the same movement instructions as #2, but we will be moving through the exercise quicker. This encourages an added core breath challenge.
Inhale and expand to prepare. Exhale to engage as you lift the hips up and curl the ball towards your bum. Inhale and expand as you expand the legs back out away from your body. This complete move is 1 repetition. Remember to keep those hips up!
127. One Leg Bridge - 2 x 15/side
Day 24 - Work It!
Remember the bridge? Well now you are going to do it with 1 leg lifted. The key here is to keep the pelvis neutral and don't let one side drop as you lift one foot off of the ground. There are a few variations so you can try them out and see what your body likes best.
Core breath added. Complete 2 sets of 15 reps per side.
Set yourself up on a flat surface, on your back with your knees bent and your shins close to vertical. For tighter hamstrings or knee limitations you may need to walk your feet slightly further away from your bum.
Option #1: Extend one leg up towards the ceiling and do repeats of the hip up and down motion staying on that same side for 10 repetitions. Your core breath will be as follows: Inhale to expand, exhale to engage as you lift the leg up towards the ceiling. Inhale to expand, exhale to engage as you bring your hips up, inhale to expand on your way down.
Option #2: Start with both feet planted, move into your bridge and then extend 1 leg out and back before you return your hips to the mat. Your core breath will be as follows: Inhale to expand, exhale to engage as you lift your hips evenly up toward the ceiling and extend the leg out. Inhale to expand as you bring the leg in and lower yourself back down.
Key points: knee of the foot planted will stay pointed straight and aligned with your hip bones-do not let it move inward and outward, press the back of your palms, arms and shoulders into the floor. This helps keep your chest open.
128. Hip Extension - 2 x 15/side
Day 24 - Work It!
An exercise that challenges your balance, core control, hips, glutes— heck it does a lot! Be careful not to hinge forward— initiate and focus the movement on the glute of the extending leg. Your standing leg should also feel that it is working to stabilize your body. You're welcome!
Props: Thera-band and a chair. Core breath added. Complete 2 sets of 15 reps per side (30 reps total)
Place your chair on your mat and stand behind it with the resistance band around your ankles. Feet will be hip width distance apart, toes pointed straight ahead, neutral pelvis with a gentle curve in your low back and ribs down.
With your hands on the back of your chair inhale to expand, exhale to engage as you extend one leg back behind you, maintaining a straight knee and only extending from the hip. Inhale to engage as bring your foot back to the mat. Repeat for 15 before you switch legs.
Key points: it's common with this exercise to overarch the low back as you begin to move the leg. Keep in mind that less is more with this movement. You will feel more glute activation when you extend the leg back only a small amount. This is another exercise that requires a substantial amount of trunk stability. It's also worth noting to not lock the knee joint on the leg that remains in contact with the floor.
Variations: Option to alter the angle in which you extend the leg back if you want to target different areas of your glute. This is not a requirement but it can be fun to play with!
129. Hamstring Stretch w/Strap - 30 seconds/side
Day 24 - Work It!
A common 'cheat' in this exercise is to allow the low black to flatten against the floor which gives the illusion of more 'length' in the hamstrings. Keep the pelvis neutral and only lift the leg as high as you can without the pelvis tipping back. The stretch may not be as strong but you are gaining valuable length that will serve your posture well.
Props needed: Yoga strap or long scarf, small pillow for your head. No core breath. Hold for 30 seconds each side
Start out laying down with the pillow placed under your head for a neutral neck. Extend one leg straight out on to your mat and wrap the strap around the ball of the opposite foot, before eventually straightening that leg.
From here lower the leg about half way to the floor while holding the ends of the strap in your hands. Check in to ensure a your pubic joint and the top of your pelvis are in the same plane.
Maintaining straight knees on both legs, begin slowly pulling the band to bring the leg up. Keep extending through the heel of the elevated leg, looking for length. Once again, check in with your pelvis to make sure you are not gaining length in the elevated leg by accidentally tucking your pelvis and flattening your back against the floor.
Key points: This release is not about how high you can move your leg towards the ceiling, it's about maintaining a neutral pelvis while still finding length in the back of the leg. It may help to imagine you are extending through the heel of the leg in the air and pulling the hip down in the direction of the floor. This allows your body to create length from 2 directions. Additionally, the backside of the leg on the mat needs to stay in contact with the floor. You can place a rolled up towel under the knee if needed for comfort.
130. Thoracic Release - 60 seconds
Day 25 - Feel The Burn
Find length and space in your upper back, shoulders and side body so you can breathe better and therefore kegel better!
No core breath added here. Stay in this posture for 60 seconds.
Start by kneeling with the ball in front of you on your mat. Toes can be tucked or top sides of the feet can remain flat on the floor if this is more comfortable. Push the ball away to allow a lengthening in your arms and side body. Arms should remain straight. If you feel a shoulder impingement or discomfort spread the arms a bit wider on the ball.
Let your hips sink back on to your heels and check in with your ribs to confirm they have not become thrust forward, causing an overarching of the low back. Take a few moments here and allow your body to bring in more length with each breath.
You can make this release more dynamic by slowly rotating the torso on the ball from side to side, attempting to gain more length in your side body. Another option is to lift your bum off of your heels and move your arms forward and back on the ball rather than side to side.
131. Ball Rollout - 2 x 10
Day 25 - Feel The Burn
Crunches only recruit about 20% of your rectus (6-pack muscles), whereas ball roll outs get close to 100%! You get way more bang for your buck here and you get some shoulder and lat action too! This exercise requires a good deal of spinal stability so it's important that you start with a modified variation and work up to where your own personal challenge is. The firmer the ball the more stability you will have.
Core breath here. Complete 2 sets of 10 reps. You may need an extra cushion under your knees for comfort.
Start on your knees with your toes tucked under. This provides additional leverage as you begin to move. (If this is uncomfortable for your toes walk yourself back to a wall and place your feet flat against the wall for stability) Next you will place your forearms on the ball with your palms facing one another. Hips are back and hovering over your calves. Check in to confirm a neutral pelvis and ribs are down.
Inhale to expand as you move the ball away from you, gliding your forearms along the top of the surface. Exhale to engage as you press the forearms down and move your hips back to your starting point.
Modifications: There are a few options that can make this feel more accessible. You can start by practicing this exercises as an isometric hold. Meaning you're not rolling forward and backwards. Essentially you are doing an elbow and knee plank while balancing on the ball. You will add your core breath as an inhale to expand and exhale to engage once you are set in your held position. This will start as a 10 second hold and you can build from there.
Once you feel that you have mastered your hold you can up the challenge by doing very small ball roll aways, giving yourself time in between each one to reset your body. Just remember to inhale on the way out and exhale on the way back.
Progression: Place your hands on the ball rather than the forearms. This allows a greater range of motion. The further you press the ball away from the body the harder this will be.
I cannot over emphasize that this move is all about stabilizing your spine. If you feel yourself start to sag or break form take the intensity down by shortening your movement range.
132. Side Plank - 2 x 15/side
Day 25 - Feel The Burn
A little different than how you may have been doing a side plank... or maybe this is a new exercise for you. It is a great way to work the inner core in a non traditional way while also targeting the outer hips. The upper body is brought in to so really, it is kinda like a full body exercise :-)
Core breath here. Complete 2 sets of 15 reps per side
From a side seated position on your mat lower yourself down so that your joints are stacked. Top shoulder lined up directly over the elbow on the floor. Hips, knees and ankles are all stacked on top of the opposite joint. Your knees should be in front of your torso so that your hips are starting in a flexed position. The hand that is furthest from the floor can be placed on the pelvis or you can use it to assist yourself when you press your hips up from the floor.
Inhale to expand, exhale to engage as both hips lift up and forward. This will create a straight line from your shoulders through the hips and down to the knees. Inhale to expand as you lower your hips down and back. Maintain a neutral neck so that you have a strong energy line from the top of your head all the way out through your knees while in the elevated position.
A common complaint with this exercise is how uncomfortable it can be on the shoulder joint. This can be caused by allowing the bottom shoulder to stay relaxed while you are moving up and down, thus causing the shoulder to float up towards the ear. It's important the use all of the muscles in the upper half of your body as well as the lower half in this exercises. For those familiar with the term, it's a press and rebound action. Press the hand, elbow and knees down into the floor so that hips and torso lift up. The shoulder is actively helping to push down.
Modification for this does not change the exercise action. It will change your set up. You can place cushion or bolster safely under your hip. This will bring the floor up slightly so that you are moving through a smaller range of motion for the bottom to the top of the exercise. As you get stronger you can take the extra height assistance away and test to see how much you've improved.
Complete 2 sets of 15 per side
133. Squat w/Arm Circles - 1 set of 5 reps circling right and 1 set of 5 reps circling left
Day 25 - Feel The Burn
Let's up the ante on our squat shall we? Extending the arms out in front and moving them challenges the core all while holding a static squat— your legs will be talking to you! When you add a weight to your outstretched arms... well that is a whole other level!
Props needed: Ball or light weight. Core breath added. Complete 1 set of 5 reps circling right and 1 set of 5 reps circling left
Set up by standing on your mat, feet hip width distance or slightly wider depending on what feels best for your body in your squat. Check in to confirm a neutral pelvis with a slight curve in your low back and ribs down.
Inhale to expand as you lower yourself down into your squat to reach your prop in the floor. Exhale to engage as you lift the prop and extend your arms out in front of you, remaining in the squat. Inhale to expand, exhale to engage tracing an invisible circle in front of you 5 times to the right. Inhale to expand, exhale to engage as you repeat to the left.
For clarity on this exercise I want to emphasize that you are breathing while you're at the bottom of the squat. This move requires that the pelvic floor be able to engage while the body is moving dynamically. You can add an extra pelvic floor challenge by holding your kegel while remaining in your squat, OR you can stick with your core breath, inhale to expand, exhale to engage.
There are many variations that can be done with this exercise. I show a few and now that you are almost through the challenge I encourage you to play with these and test your ability to connect with your core breath.
Modification #1: Begin with prop in hand and then lower yourself into your squat (inhale on the way down, exhale on the way up)
Modification #2: Stand up in between each set of 5 circles.
Modification #3: Break it down into steps to find your threshold.
134. Supine Butterfly - 60 seconds
Day 25 - Feel The Burn
Your inner thighs influence the pelvic floor. Take time to lengthen them so they can better help your core.
No core breath with this release.
Stay in this posture for 60 seconds. The main goal here is to be able to relax into this release. If you are feeling a deep stretch but it is causing tension in other parts of the body add a prop to modify.
Modification for this release can be done by placing pillows, yoga bolsters or blocks, rolled up towels or anything creative that you have at home under each leg. When placing a prop closer to the hip you will feel more support. As you move the support closer to the knees you will experience a greater level of stretch.
135. Supine Butterfly - 60 seconds
Day 26 - Kegel Mojo Baby!
Your inner thighs influence the pelvic floor. Take time to lengthen them so they can better help your core.
No core breath with this release.
Stay in this posture for 60 seconds. The main goal here is to be able to relax into this release. If you are feeling a deep stretch but it is causing tension in other parts of the body add a prop to modify.
Modification for this release can be done by placing pillows, yoga bolsters or blocks, rolled up towels or anything creative that you have at home under each leg. When placing a prop closer to the hip you will feel more support. As you move the support closer to the knees you will experience a greater level of stretch.
136. Squat w/Arm Circles - 1 set of 5 reps circling right and 1 set of 5 reps circling left
Day 26 - Kegel Mojo Baby!
Let's up the ante on our squat shall we? Extending the arms out in front and moving them challenges the core all while holding a static squat— your legs will be talking to you! When you add a weight to your outstretched arms... well that is a whole other level!
Props needed: Ball or light weight. Core breath added. Complete 1 set of 5 reps circling right and 1 set of 5 reps circling left
Set up by standing on your mat, feet hip width distance or slightly wider depending on what feels best for your body in your squat. Check in to confirm a neutral pelvis with a slight curve in your low back and ribs down.
Inhale to expand as you lower yourself down into your squat to reach your prop in the floor. Exhale to engage as you lift the prop and extend your arms out in front of you, remaining in the squat. Inhale to expand, exhale to engage tracing an invisible circle in front of you 5 times to the right. Inhale to expand, exhale to engage as you repeat to the left.
For clarity on this exercise I want to emphasize that you are breathing while you're at the bottom of the squat. This move requires that the pelvic floor be able to engage while the body is moving dynamically. You can add an extra pelvic floor challenge by holding your kegel while remaining in your squat, OR you can stick with your core breath, inhale to expand, exhale to engage.
There are many variations that can be done with this exercise. I show a few and now that you are almost through the challenge I encourage you to play with these and test your ability to connect with your core breath.
Modification #1: Begin with prop in hand and then lower yourself into your squat (inhale on the way down, exhale on the way up)
Modification #2: Stand up in between each set of 5 circles.
Modification #3: Break it down into steps to find your threshold.
137. Split Squat - 2 x 15/side
Day 26 - Kegel Mojo Baby!
When I teach the split squat to my clients I have them imagine they are a horse on a merry go round, with a pole running right through their centre. This keeps the alignment from going forward and back. The body can only move up and down. The longer the stance, the easier it is to go up and down. This keeps the front knee tracking over the front ankle instead of moving forward and over the toes.
Core breath added. Complete 2 sets of 15 reps per leg.
Set up by standing on your mat with your feet hips width distance, a gentle curve in your low back and your ribs down. Place your hands on your hips and take a long step back with one leg. Front knee will have a slight bend and your rear heel will remain elevated not touching the floor. Find your balance before you begin to move.
Inhale to expand as you bend both knees lowering yourself down. Exhale to engage as you press back up into your start position. Weight should be evenly distributed between the front and back leg.
There are 100's of variations, progressions and modifications that can be done with this exercise. I will list a few below. The most important thing is that you do what feels best for your body....and don't forget the core breath!
---------------------------------------------------------------------------------------------------------------------------
Knee Modification #1: Add a chair on one side of you to help with balance
Knee Modification #2: Less depth in your split squat, keeping yourself in a shorter range of motion with less bend in your knees.
Knee Modification #3: If none of these variations feel good you can start with stepping up onto a step at home and slowly lowering yourself back down. Your foot will remain on top of the step for all 15 reps. This will ensure that you keep proper foot placement as you are moving.
Take note of the same key points. Foot placement on the step and where your knee is in relation to your ankle. (knee stays over the ankle, not in front or behind....this advice will change as you get stronger) Knee will also stay tracking forward, not moving in towards the midline of your body or outside of the line of your hip. Note the core breath with this variation: Inhale to expand as you prepare, exhale to engage as you press yourself up on the step, inhale to engage as you lower yourself back down.
----------------------------------------------------------------------------------------------------------------
Toe Modifications: Two options if you have limited toe mobility. First you can use an elevated surface for your rear foot and place the laces side of your foot facing downward on the elevated surface. This requires zero flexion in the toes or the ball of the foot. This can add a balance challenge so it's recommended at first to have something to hold onto.
The second option will require a shoe on the rear foot. When you step back you will place your rear foot on a wall behind you. Foot will be flat on the wall with tippy toes pointed straight down to the floor. From here you will bend both knees lowering yourself down (inhale on the way down, exhale on the way up)
----------------------------------------------------------------------------------------------------------------------------
Progressions: Turn this into a lunge instead of a split squat. Start with a reverse lunge. If those feel good then you can progress to a forward lunge, and then move into a walking lunge. Staying focused on the core breath as you move can be the most challenging part of this exercise when you are well versed in lunges. The breath may take greater concentration if it's the opposite of what you have been practicing. Inhale on your way down, exhale on your way up.
Point to remember: with all of the progressions listed it's ok to have a slight forward lean of the torso, but it's not necessary. The forward lean will engage your glute a bit more. While keeping your torso straight up and down like a carousel horse will give you greater activation in your quads. Pick what works best for you.
138. Monster Walk - 12 each direction
Day 26 - Kegel Mojo Baby!
It's like side stepping and walking in a squat— sounds fun right? Don't worry about adding the core breath here, just go as low as you can, and walk side to side and forward... and then back... and feel the burn!
No Core Breath in this exercise. Complete 12 steps in each direction.
Set up with a band positioned just above both knees. With gentle tension on the band your feet will be slightly wider than pelvis width distance and the toes pointed straight ahead. Hands placed on your hips or in front of you to help counter balance. Squat down as if you're going to sit in an invisible chair, hinge at the hips, send your bum back and make sure your pelvis does not tuck under. From there take a lateral steps, initiating from your hip. Let the follow leg take a step to catch up, but maintain tension on the band.
Once you've completed your lateral steps you can turn and face forward with the same set up, remaining in your squat. Go through your check points to make sure you are still in a good squat position and the pelvis is in neutral. Keeping the feet and knees aligned walk forward 5-8 steps while staying low, followed by taking the same number of steps walking backwards.
This can be modified by not sitting as deeply into the squat posture. Or made more challenging by sending the hips lower in your squat.
139. Stacked Butterfly - 30 seconds/side
Day 26 - Kegel Mojo Baby!
Oh those hips! How they love this pose! (Inner thighs too!)
No core breath. 30 seconds each side. Prop needed: Yoga block, small pillow or a rolled up towel. (just one of these options is necessary)
Lying on your back with your head and neck in neutral, allow your right knee to fall out to the side maintaining a flexed ankle.
Now place your left ankle, also flexed, in the nook that separates the top of your right calf and your right knee. From here allow the top knee to gently open towards the floor. Here is where you will place your prop under the left hip for some extra support. Reminder that this should feel relaxing and you are seeking a gentle stretch.
If stacking the foot in the nook feels like too much of a stretch to begin you can work your way into this pose. Your setup will be the same, but you can place the top foot on top of the bottom ankle and then work your way up the leg from there. As your hips begin to open and you settle into the pose you can adjust your foot placement by moving it closer to the knee.
Key point to remember: maintain ankle flexion on both sides. Ankle flexion= top of foot pulled towards the knees.
140. Posterior Pelvic Floor Release - 30 seconds/side
Day 27 - Queenly Kegels
Always a fave! Feel your pelvic floor sigh as the ball sinks in.
30 seconds per side. No core breath with this release.
You will need a hard surface so the ball does not sink into the chair.
Place the ball between your sitz bone and your anus.
Maintain relaxed breathing as you let yourself sink further into the ball with each breath. You are looking to create space and let go of any tension you may be holding.
141. Push-Ups With Ball - 2 x 15
Day 27 - Queenly Kegels
A great exercise for those that want some good upper body but don't like being on their knees or find the straight leg ones a bit too much. This is a great option for women with prolapse or those who find push ups bring on symptoms like leaking.
Core breath here. Complete 2 sets of 15 reps
Starting on your mat with the stability ball in font of you touching your thighs. Gently lower yourself down so that your pelvis and abdomen are on the ball. Place your hands on the ground and slowly walk yourself forward until your feet are off the ground and you are balancing on the ball with your legs extended back.
Wrists are slightly wider than shoulder width distance. Keep your pelvis in neutral and have a strong energy line from the crown of your head through the tips of the toes. This keeps your body in a strong posture.
Inhale to expand as you lower yourself down. Exhale to engage as you press yourself back up.
Points to remember with a pushup: keep your elbows pointed slightly back. Anywhere from a 60-45 degree angle will protect your shoulders.
This exercise can be altered by changing your body's position on the ball. For a modification walk your hands back closer to the ball to create a shorter level. Or you can walk your hands further away from the ball to create more of a challenge.
142. Side Plank - 2 x 15/side
Day 27 - Queenly Kegels
A little different than how you may have been doing a side plank... or maybe this is a new exercise for you. It is a great way to work the inner core in a non traditional way while also targeting the outer hips. The upper body is brought in too so really, it is kinda like a full body exercise :-)
Core breath here. Complete 2 sets of 15 reps per side
From a side seated position on your mat lower yourself down so that your joints are stacked. Top shoulder lined up directly over the elbow on the floor. Hips, knees and ankles are all stacked on top of the opposite joint. Your knees should be in front of your torso so that your hips are starting in a flexed position. The hand that is furthest from the floor can be placed on the pelvis or you can use it to assist yourself when you press your hips up from the floor.
Inhale to expand, exhale to engage as both hips lift up and forward. This will create a straight line from your shoulders through the hips and down to the knees. Inhale to expand as you lower your hips down and back. Maintain a neutral neck so that you have a strong energy line from the top of your head all the way out through your knees while in the elevated position.
A common complaint with this exercise is how uncomfortable it can be on the shoulder joint. This can be caused by allowing the bottom shoulder to stay relaxed while you are moving up and down, thus causing the shoulder to float up towards the ear. It's important the use all of the muscles in the upper half of your body as well as the lower half in this exercises. For those familiar with the term, it's a press and rebound action. Press the hand, elbow and knees down into the floor so that hips and torso lift up. The shoulder is actively helping to push down.
Modification for this does not change the exercise action. It will change your set up. You can place cushion or bolster safely under your hip. This will bring the floor up slightly so that you are moving through a smaller range of motion for the bottom to the top of the exercise. As you get stronger you can take the extra height assistance away and test to see how much you've improved.
143. Ball Rollout - 2 x 12
Day 27 - Queenly Kegels
Crunches only recruit about 20% of your rectus (6-pack muscles), whereas ball roll outs get close to 100%! You get way more bang for your buck here and you get some shoulder and lat action too! This exercise requires a good deal of spinal stability so it's important that you start with a modified variation and work up to where your own personal challenge is. The firmer the ball the more stability you will have.
Core breath here. Complete 2 sets of 12 reps. You may need an extra cushion under your knees for comfort.
Start on your knees with your toes tucked under. This provides additional leverage as you begin to move. (If this is uncomfortable for your toes walk yourself back to a wall and place your feet flat against the wall for stability) Next you will place your forearms on the ball with your palms facing one another. Hips are back and hovering over your calves. Check in to confirm a neutral pelvis and ribs are down.
Inhale to expand as you move the ball away from you, gliding your forearms along the top of the surface. Exhale to engage as you press the forearms down and move your hips back to your starting point.
Modifications: There are a few options that can make this feel more accessible. You can start by practicing this exercises as an isometric hold. Meaning you're not rolling forward and backwards. Essentially you are doing an elbow and knee plank while balancing on the ball. You will add your core breath as an inhale to expand and exhale to engage once you are set in your held position. This will start as a 10 second hold and you can build from there.
Once you feel that you have mastered your hold you can up the challenge by doing very small ball roll aways, giving yourself time in between each one to reset your body. Just remember to inhale on the way out and exhale on the way back.
Progression: Place your hands on the ball rather than the forearms. This allows a greater range of motion. The further you press the ball away from the body the harder this will be.
I cannot over emphasize that this move is all about stabilizing your spine. If you feel yourself start to sag or break form take the intensity down by shortening your movement range.
144. Belly Release - 60 seconds
Day 27 - Queenly Kegels
No core breath with this exercise. Stay in this position for 60 seconds
Have you ever checked in with your belly and consciously thought about relaxing it? Holding the abs in all day is not serving you— it interferes with digestion and breathing and puts pressure on your pelvic floor. Let it go.
From a kneeling position come onto all fours. Knees will be pelvis width distance and lined up directly under the hips. Hands placed directly under your shoulders with your fingertips spread wide and neck remains long. Check in to confirm the gentle curve in your low back and that your ribs are still in line with the top of the pelvis.
Once you are in position you will empower the belly to gently expand towards the floor. It will remain expanded and relaxed. As you take a breath each time allow for a full expansion. These will be followed by a soft exhalation. No blueberries or pelvic floor engagement. This is to allow the belly to let go of tension, to relax and to release.
If this is challenging for your wrists there are a few things you can do to take some of the pressure off of the joints. First try pressing evenly into each finger tip. This helps to distribute the weight in the hands. Another option is to place a small towel under each palm to minimize the wrist flexion angle. If that doesn't help you can ball your fists and place your knuckles on the ground, being careful to maintain a straight line at the wrist angle.
For those needing an option off of the knees, this can be done standing with your hands placed on the seat of a chair. The most important thing to remember is that you will still need to arrange your posture as close to original exercise as possible. Hands directly under the shoulders but on the chair, feet will be pelvis width distance and lined up directly under the hips. Gentle cure in the low back and the bottom of the ribs in line with the top of the pelvis. From here allow the expansion of the belly as you breath.
145. Lower Psoas Release - 30-60 seconds
Day 28 - Commit To Kegels
A muscle called the Illiacus is a neighbor of the lower part of the psoas (some people call it the Illiopsoas). This release is meant to create length in the lower part of the muscle that, when tight, can pull the pelvis into a posterior tilt. This is an allowing exercise, not a doing exercise (as are all of the releases).
Prop needed: Small block, towel for your head.
No core breath. Hold 30-60 seconds.
Set yourself up on a flat surface, on your back with your knees bent and your shins close to vertical. For tighter hamstrings or knee limitations you may need to walk your feet slightly further away from your bum.
Slowing lift your hips and slide the block in the lowest position just below your pelvis, close to the top of your sacrum (large flat bone on the lower part of the spine) If you have walked your feet further out to get into the pose walk them closer to your bum again. Your knees will be pointed straight up towards the ceiling and your ankles directly under the knees.
Set your hips back onto the block and let your body settle into place. Allow yourself to relax here. You are not pressing your back down into the floor, you are allowing the muscles to lengthen while supported. You can stay here for several minutes if you like.
146. Hip Extension - 2 x 15/side
Day 28 - Commit To Kegels
An exercise that challenges your balance, core control, hips, glutes— heck it does a lot! Be careful not to hinge forward— initiate and focus the movement on the glute of the extending leg. Your standing leg should also feel that it is working to stabilize your body. You're welcome!
Props: Thera-band and a chair. Core breath added. Complete 2 sets of 15 reps per side (30 reps total)
Place your chair on your mat and stand behind it with the resistance band around your ankles. Feet will be hip width distance apart, toes pointed straight ahead, neutral pelvis with a gentle curve in your low back and ribs down.
With your hands on the back of your chair inhale to expand, exhale to engage as you extend one leg back behind you, maintaining a straight knee and only extending from the hip. Inhale to engage as bring your foot back to the mat. Repeat for 15 before you switch legs.
Key points: it's common with this exercise to overarch the low back as you begin to move the leg. Keep in mind that less is more with this movement. You will feel more glute activation when you extend the leg back only a small amount. This is another exercise that requires a substantial amount of trunk stability. It's also worth noting to not lock the knee joint on the leg that remains in contact with the floor.
Variations: Option to alter the angle in which you extend the leg back if you want to target different areas of your glute. This is not a requirement but it can be fun to play with!
147. Standing Bird Dog - 2 x 15/side
Day 28 - Commit To Kegels
You've most likely done the floor version of this exercise where you start out on hands and knees and then lift opposite arm and leg. Same thing here but you are standing. This of course adds a different challenge with balance. Have fun with it!
Core breath added. Complete 2 sets of 15 reps per side (30 total)
Start out standing on your mat with your feet pelvis width apart and toes pointed straight ahead. Check in to confirm neutral pelvis, a small curve in your low back and your ribs down.
Inhale to expand, exhale to engage as you reach with your left arm and your right leg away from the body, extending the limbs long and hinging forward at the hip joint. Inhale to expand as you return torso, arm and leg to the start point. Repeat with the opposite side.
Points to remember: Your torso and the moving leg act as a teeter-totter with the hip joint acting as the fulcrum. When your trunk begins to move forward your leg will extend back, moving as one unit rather than moving in segments.
Modification: Stand close to a wall so that you feel a sense of safety with your balance, without needing to add a chair.
148. Frankenstein Walk - 2 x 12 each direction
Day 28 - Commit To Kegels
No Core Breath in this exercise. Complete 2 sets or 12 steps in each direction.
Set up with a band positioned just above both knees. With gentle tension on the band your feet will be slightly wider than pelvis width distance and the toes pointed straight ahead. Hands placed on your hips.
Take a lateral step initiating from your hip, keeping both legs straight. Let the follow leg take a step to catch up, but maintain tension on the band. You can pretend you have an invisible box between your feet so that the feet are able to maintain the same distance with each step.
The trick here is to keep your legs straight and maintain flat feet as you step and land. The tendency will be to land on your toes first and then place your heel down... try to center your attention to landing on the outside of the foot. Also be mindful of "rocking in your pelvis". If you find that your hands are moving up and down while on your hips as you are stepping, place a little more attention into moving from the hip joint. Keeping your pelvis level during the exercise is a huge challenge! This exercise is to be a slow, controlled side stepping movements. Make sure you go both ways.
149. Psoas Release - 5 mins
Day 28 - Commit To Kegels
A tight psoas can tuck the pelvis under, it can thrust the ribs forward and pulls the low back into an exaggerated curve. All of this can interfere with optimal core and pelvic floor function so taking time to really let the psoas find length and suppleness is a good thing. For those with an already exaggerated curve in your low back this is a great pose to add into your routine.
Props needed: Bolster or a blanket folded into a rectangle shape thick enough to create space between your ribs and the floor when you lay dow. Additionally a small pillow or towel for your head if needed.
No core breath. Stay here 5 minutes
Set up: Lower yourself down so that the bottom edge of the elevated surface is between your shoulder blades and just above your bra strap. Laying on your back, extend your legs straight out. It's ok to let your feet and legs relax and roll out to the sides. Here you can add the pillow under your head to help maintain a neutral neck position.
As you are settling into the release check in with your pelvis and make sure your pubic joint is in the same plane as your 2 hip bones. You can do this by placing your hands on the front of your pelvis and your fingertips at pubic joint. From here take your hands and feel the space between your back ribs and the floor. You want to have space to allow the ribs to sink down towards your mat. Take note, as this is your starting point. Extend your arms out to the sides and relax in this space. Periodically checking under your torso to feel if the space between you and the floor is decreasing as your ribs start to sink.
To exit the pose roll to one side and press yourself up to seated position with your hands.
150. Free Gift!
Day 28 - Commit To Kegels
No video found.
Congrats!! You've earned a copy of my ebook Your Pelvic Floor: The Inside Story
The book is a comprehensive and fun exploration of pelvic floor health across all the stages of womanhood: from pregnancy, through motherhood, and into menopause. Illustrated with simple diagrams and fun, casual language, it is your ultimate guide to restoring and preserving the most important and tragically ignored part of women’s health.
Look to the right to find the downloads section where you can get your free copy. I've added an image here so you identify where to click for your download. 
151. What's Next?
Day 28 - Commit To Kegels
No video found.
Congratulations! You have completed the Buff Muff challenge!
You have witnessed first hand how easy it is to live a kegel-centric lifestyle and I want that to continue! You are now ready to checkout the workouts in the Workouts section, which are available to all access pass members.
There is a variety of on demand workouts as well as standard Buff Muff Workouts like you have done here in the challenge. I also have a level #2 Buff Muff 28 day challenge!
Some people like to stick with the format they became accustomed to in the challenge, while others prefer to press play and follow me through an entire workout.
Both options are available to you anytime with the membership.
If you are not yet an all access pass member you can upgrade here. You can pay monthly or yearly.
This is a gentle reminder that even if you have had an improvement or elimination of symptoms, you need to keep doing the daily workout. Consistency is key...for life!
Some people are shocked by that, but just like we don't stop brushing our teeth when we get an all clear from the dentist...we don't stop doing whole body pelvic floor exercise when we don't have any symptoms. We want to stay symptom free for life....so we need to keep buffing our muffs for life!
Those who see the best and longest lasting results are in the membership. They are progressing day by day and getting stronger and stronger!
I look forward to continuing to support you on your pelvic health adventure.
And one more thing.... I want all women to know that help exists and that pelvic floor dysfunction is NOT something they need to suffer with. I would love to get some testimonials that I can share to help others feel confident about trying an online program to help themselves. I walk you through how to do it - no fancy equipment needed - just your phone or laptop camera and a finger to press record. Easy peasy! Thank you so much!